Image Data Processing and Augmentation
![]()
![]()
![]()
In a computer vision task, if the data volume is small or the scenario samples are simple, the training accuracy will be affected. In this case, you may preprocess images by performing image augmentation, to improve generalization of the model.
MindSpore provides the vision module for image augmentation.
The following sections will take the CIFAR-10 dataset and the MNIST dataset as examples to briefly introduce these two image data loading methods and use several commonly used vision augmentation operations. For more image dataset loading methods, refer to the API documentation mindspore.dataset. For more vision augmentation operations, refer to the API documentation mindspore.dataset.vision.
Load Image Data
The following sample code downloads and decompresses the CIFAR-10 dataset and the MNIST dataset to the specified locations, respectively. This code is expected to take three to five minutes to execute when the network is in good condition.
[1]:
import os
from mindvision.dataset import DownLoad

dl_path_cifar10 = "./datasets"
dl_url_cifar10 = "https://mindspore-website.obs.cn-north-4.myhuaweicloud.com/notebook/datasets/cifar-10-binary.tar.gz"

dl = DownLoad()

# Download the CIFAR-10 dataset and unzip it
dl.download_and_extract_archive(url=dl_url_cifar10, download_path=dl_path_cifar10)

# MNIST dataset save path
dl_path_mnist = "./mnist"
dl_url_mnist_labels = "http://yann.lecun.com/exdb/mnist/train-labels-idx1-ubyte.gz"
dl_url_mnist_images = "http://yann.lecun.com/exdb/mnist/train-images-idx3-ubyte.gz"

# Download the MNIST dataset and unzip it
dl.download_and_extract_archive(url=dl_url_mnist_labels, download_path=dl_path_mnist)
dl.download_and_extract_archive(url=dl_url_mnist_images, download_path=dl_path_mnist)

image_gz = "./mnist/train-images-idx3-ubyte.gz"
label_gz = "./mnist/train-labels-idx1-ubyte.gz"

# Delete compressed files
if os.path.exists(image_gz):
    os.remove(image_gz)
if os.path.exists(label_gz):
    os.remove(label_gz)
Use the mindspore.dataset.Cifar10Dataset interface to load the CIFAR-10 data, and use the mindspore.dataset.MnistDataset interface to load the MNIST data. The example code is as follows:
[2]:
import matplotlib.pyplot as plt
import mindspore.dataset as ds
%matplotlib inline
DATA_DIR_MNIST = "./mnist/"
DATA_DIR_CIFAR10 = "./datasets/cifar-10-batches-bin/"
ds.config.set_seed(1)
# Load the dataset and select 4 images
dataset_cifar10 = ds.Cifar10Dataset(DATA_DIR_CIFAR10, num_samples=4)
dataset_mnist = ds.MnistDataset(DATA_DIR_MNIST, num_samples=4)
def printDataset(dataset_list, name_list):
"""Show dataset"""
dataset_sizes = []
for dataset in dataset_list:
dataset_sizes.append(dataset.get_dataset_size())
row = len(dataset_list) # Displayed number of rows
column = max(dataset_sizes) # Displayed number of columns
pos = 1
for i in range(row):
for data in dataset_list[i].create_dict_iterator(output_numpy=True):
plt.subplot(row, column, pos) # Display location
plt.imshow(data['image'].squeeze(), cmap=plt.cm.gray) # Display content
plt.title(data['label']) # Show title
print(name_list[i], " shape:", data['image'].shape, "label:", data['label'])
pos = pos + 1
pos = column * (i + 1) + 1
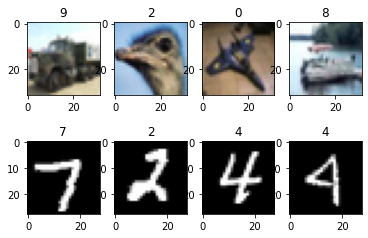
printDataset([dataset_cifar10, dataset_mnist], ["CIFAR-10", "MNIST"])
CIFAR-10  shape: (32, 32, 3) label: 9
CIFAR-10  shape: (32, 32, 3) label: 2
CIFAR-10  shape: (32, 32, 3) label: 0
CIFAR-10  shape: (32, 32, 3) label: 8
MNIST  shape: (28, 28, 1) label: 7
MNIST  shape: (28, 28, 1) label: 2
MNIST  shape: (28, 28, 1) label: 4
MNIST  shape: (28, 28, 1) label: 4
mindspore.dataset.vision module
vision is a module that supports vision augmentations. Some image augmentations are implemented with C++ OpenCV to provide high performance. Other additional image augmentations are developed with Python PIL.
To explicitly use OpenCV implementation, use the Decode(to_pil=False) operation to decode images and subsequent operations will have an OpenCV implemented operation selected(if it exists). To explicitly switch to PIL implementation in the data pipeline, use the ToPIL() operation followed by the desired operations.
To explicitly use PIL implementation, use the Decode(to_pil=True) operation to decode images and subsequent operations will have a PIL implemented operation selectedif(if it exists). To explicitly switch to OpenCV implementation in the data pipeline, use the ToNumpy() operation followed by the desired operations.
The following section shows some simple examples with a few vision operations.
RandomCrop
The RandomCrop operation crops the input image at a random location.
Parameter Description:
size: The output size of the cropped image.padding: The number of pixels to pad each border of the image.pad_if_needed: Pad the image if either side is smaller than the given output size.fill_value: The pixel intensity of the borders.padding_mode: The method of padding.
The following example first uses the sequential sampler to load the CIFAR-10 dataset, then randomly crops the loaded image with a length and width of 10, and finally outputs the image shape and corresponding label before and after the crop, and displays the image.
[3]:
import matplotlib.pyplot as plt
import mindspore.dataset as ds
import mindspore.dataset.vision as vision

ds.config.set_seed(1)

# CIFAR-10 dataset loading path
DATA_DIR = "./datasets/cifar-10-batches-bin/"

# Pick 3 images using the SequentialSampler sampler
sampler = ds.SequentialSampler(num_samples=3)
dataset1 = ds.Cifar10Dataset(DATA_DIR, sampler=sampler)

# Use RandomCrop to perform 10*10 random cropping operations on the original image
random_crop = vision.RandomCrop([10, 10])
dataset2 = dataset1.map(operations=random_crop, input_columns=["image"])

printDataset([dataset1, dataset2], ["Source image", "Cropped image"])
Source image  shape: (32, 32, 3) label: 6
Source image  shape: (32, 32, 3) label: 9
Source image  shape: (32, 32, 3) label: 9
Cropped image  shape: (10, 10, 3) label: 6
Cropped image  shape: (10, 10, 3) label: 9
Cropped image  shape: (10, 10, 3) label: 9

As can be seen from the above printing and displayed image results, before and after the image is randomly cropped, the label does not change, but the shape changes. The resolution of the image before cropping is 32×32, and the resolution after cropping is 10×10.
RandomHorizontalFlip
The RandomHorizontalFlip operation randomly flips the input image horizontally.
Parameter Description:
prob: Probability of the image being flipped.
The following example first uses the random sampler to load the CIFAR-10 dataset, then randomly flips the loaded image horizontally with a probability of 0.8, and finally outputs the image shape and corresponding label before and after the flip, and displays the image.
[4]:
import matplotlib.pyplot as plt
import mindspore.dataset as ds
import mindspore.dataset.vision as vision

ds.config.set_seed(1)

# CIFAR-10 dataset loading path
DATA_DIR = "./datasets/cifar-10-batches-bin/"

# Randomly pick 4 images using the RandomSampler sampler
sampler = ds.RandomSampler(num_samples=4)
dataset1 = ds.Cifar10Dataset(DATA_DIR, sampler=sampler)

# Use RandomHorizontalFlip to randomly flip the original image horizontally
random_horizontal_flip = vision.RandomHorizontalFlip(prob=0.8)
dataset2 = dataset1.map(operations=random_horizontal_flip, input_columns=["image"])

printDataset([dataset1, dataset2], ["Source image", "Flipped image"])
Source image  shape: (32, 32, 3) label: 7
Source image  shape: (32, 32, 3) label: 8
Source image  shape: (32, 32, 3) label: 2
Source image  shape: (32, 32, 3) label: 9
Flipped image  shape: (32, 32, 3) label: 7
Flipped image  shape: (32, 32, 3) label: 8
Flipped image  shape: (32, 32, 3) label: 2
Flipped image  shape: (32, 32, 3) label: 9
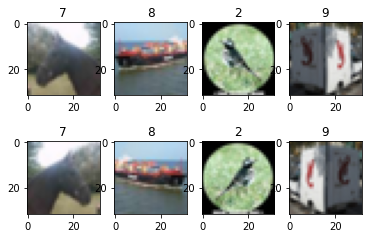
It can be seen from the above printing and displayed image results that after the random horizontal flip operation, the shape and label of the image have not changed, and some images have been flipped horizontally.
Resize
The Resize operation scales the input image to the given size.
Parameter Description:
size: The output size of the resized image.interpolation: Image interpolation mode.
The following example first loads the MNIST dataset [2], then scales the loaded image to (101, 101) size, and finally outputs the image shape and corresponding label before and after scaling, and displays the image.
[5]:
import matplotlib.pyplot as plt
import mindspore.dataset as ds
import mindspore.dataset.vision as vision

# MNIST dataset loading path
DATA_DIR = "./mnist/"

# Load the MNIST dataset and select 4 images
dataset1 = ds.MnistDataset(DATA_DIR, num_samples=4, shuffle=False)

# Scale the image to 101x101 using the Resize operation
resize = vision.Resize(size=[101, 101])
dataset2 = dataset1.map(operations=resize, input_columns=["image"])

printDataset([dataset1, dataset2], ["Source image", "Resized image"])
Source image  shape: (28, 28, 1) label: 5
Source image  shape: (28, 28, 1) label: 0
Source image  shape: (28, 28, 1) label: 4
Source image  shape: (28, 28, 1) label: 1
Resized image  shape: (101, 101, 1) label: 5
Resized image  shape: (101, 101, 1) label: 0
Resized image  shape: (101, 101, 1) label: 4
Resized image  shape: (101, 101, 1) label: 1
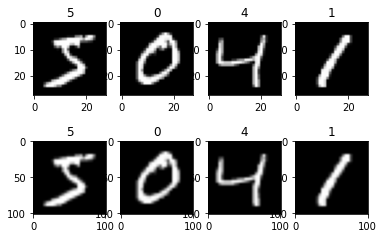
As can be seen from the above printing and displayed image results, before and after scaling, the shape of the image has changed, but the label has not changed. The image resolution before scaling is 28×28, and after scaling, the image resolution is 101×101.
Invert
The Invert operation inverts the input image in RGB mode.
The following example first loads the CIFAR-10 dataset, then defines and applies the invert operation on the loaded image, and finally outputs the image shape and label before and after inversion, and displays the image.
[6]:
import matplotlib.pyplot as plt
import mindspore.dataset as ds
import mindspore.dataset.vision as vision

ds.config.set_seed(18)

# CIFAR-10 dataset loading path
DATA_DIR = "./datasets/cifar-10-batches-bin/"

# Load the CIFAR-10 dataset and select 4 images
dataset1 = ds.Cifar10Dataset(DATA_DIR, num_samples=4, shuffle=True)

# Invert the image
invert = vision.Invert()
dataset2 = dataset1.map(operations=invert, input_columns=["image"])

printDataset([dataset1, dataset2], ["Source image", "Inverted image"])
Source image  shape: (32, 32, 3) label: 8
Source image  shape: (32, 32, 3) label: 1
Source image  shape: (32, 32, 3) label: 9
Source image  shape: (32, 32, 3) label: 7
Inverted image  shape: (32, 32, 3) label: 8
Inverted image  shape: (32, 32, 3) label: 1
Inverted image  shape: (32, 32, 3) label: 9
Inverted image  shape: (32, 32, 3) label: 7
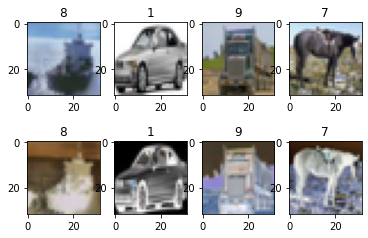
As can be seen from the above printing and displayed image results, before and after the inversion operation, the shape and label of the image have not changed, but the color has changed.
Deprecated c_transforms and py_transforms
Beginning in version 1.8 of MindSpore, the following vision modules are deprecated:
mindspore.dataset.vision.c_transforms
mindspore.dataset.vision.py_transforms
One should use the following unified module for which the underlying implementation may be C++ OpenCV code and/or Python PIL code:
Special Attention
When upgrading from the deprecated c_transforms or py_transforms modules to the unified modules, the same operation that was used in c_transforms or py_transforms can be used with no changes in operation name or input arguments.
Except for the following cases:
From deprecated mindspore.dataset.vision.py_transforms, when using unified mindspore.dataset.vision:
Replace
Decode()with new argumentto_pil=TrueforDecode(to_pil=True)Replace
Cutout(...)with unified operation name and new argumentis_hwc=FalseforCutOut(..., is_hwc=False)Replace
Normalize(...)with new argumentis_hwc=FalseforNormalize(..., is_hwc=False)Replace
NormalizePad(...)with new argumentis_hwc=FalseforNormalizePad(..., is_hwc=False)
From deprecated mindspore.dataset.vision.py_transforms or mindspore.dataset.vision.c_transforms, when using unified mindspore.dataset.vision:
Replace
RgbToBgrwith unified operation nameConvertColor
From deprecated mindspore.dataset.vision.py_transforms:
Replace
ToTypewith unified operation nameTypeCastin unifiedmindspore.dataset.transforms
Please notice that when the operation throws an error, the error message provided from the deprecated operation may be different from the error message provided from the unified operation.
References
[1] Alex Krizhevsky. Learning_Multiple Layers of Features from Tiny Images.
[2] Y. LeCun, L. Bottou, Y. Bengio, and P. Haffner. Gradient-based learning applied to document recognition.
The sample code in this chapter relies on third-party support package
matplotlib, which can be installed using the commandpip install matplotlib. If this document is run underNotebook, you need to restart the kernel after installation to execute subsequent code.