模型安全
概述
本教程介绍MindArmour提供的模型安全防护手段,引导您快速使用MindArmour,为您的AI模型提供一定的安全防护能力。
AI算法设计之初普遍未考虑相关的安全威胁,使得AI算法的判断结果容易被恶意攻击者影响,导致AI系统判断失准。攻击者在原始样本处加入人类不易察觉的微小扰动,导致深度学习模型误判,称为对抗样本攻击。MindArmour模型安全提供对抗样本生成、对抗样本检测、模型防御、攻防效果评估等功能,为AI模型安全研究和AI应用安全提供重要支撑。
对抗样本生成模块支持安全工程师快速高效地生成对抗样本,用于攻击AI模型。
对抗样本检测、防御模块支持用户检测过滤对抗样本、增强AI模型对于对抗样本的鲁棒性。
评估模块提供多种指标全面评估对抗样本攻防性能。
这里通过图像分类任务上的对抗性攻防,以攻击算法FGSM和防御算法NAD为例,介绍MindArmour在对抗攻防上的使用方法。
本例面向CPU、GPU、Ascend 910 AI处理器,你可以在这里下载完整的样例代码:https://gitee.com/mindspore/docs/tree/r0.2/tutorials/tutorial_code/model_safety
mnist_attack_fgsm.py:包含攻击代码。
mnist_defense_nad.py:包含防御代码。
建立被攻击模型
以MNIST为示范数据集,自定义的简单模型作为被攻击模型。
引入相关包
import sys
import time
import numpy as np
from scipy.special import softmax

from mindspore import dataset as ds
import mindspore.common.dtype as mstype
import mindspore.dataset.transforms.vision.c_transforms as CV
import mindspore.dataset.transforms.c_transforms as C
from mindspore.dataset.transforms.vision import Inter
import mindspore.nn as nn
from mindspore.common.initializer import TruncatedNormal
from mindspore import Model
from mindspore import Tensor
from mindspore import context
from mindspore.train.serialization import load_checkpoint, load_param_into_net

from mindarmour.attacks.gradient_method import FastGradientSignMethod
from mindarmour.utils.logger import LogUtil
from mindarmour.evaluations.attack_evaluation import AttackEvaluate

context.set_context(mode=context.GRAPH_MODE, device_target="Ascend")

LOGGER = LogUtil.get_instance()
TAG = 'demo'
加载数据集
利用MindSpore的dataset提供的MnistDataset接口加载MNIST数据集。
# generate training data
def generate_mnist_dataset(data_path, batch_size=32, repeat_size=1,
                           num_parallel_workers=1, sparse=True):
    """
    create dataset for training or testing
    """
    # define dataset
    ds1 = ds.MnistDataset(data_path)

    # define operation parameters
    resize_height, resize_width = 32, 32
    rescale = 1.0 / 255.0
    shift = 0.0

    # define map operations
    resize_op = CV.Resize((resize_height, resize_width),
                          interpolation=Inter.LINEAR)
    rescale_op = CV.Rescale(rescale, shift)
    hwc2chw_op = CV.HWC2CHW()
    type_cast_op = C.TypeCast(mstype.int32)

    # apply map operations on images
    if not sparse:
        one_hot_enco = C.OneHot(10)
        ds1 = ds1.map(input_columns="label", operations=one_hot_enco,
                      num_parallel_workers=num_parallel_workers)
        type_cast_op = C.TypeCast(mstype.float32)
    ds1 = ds1.map(input_columns="label", operations=type_cast_op,
                  num_parallel_workers=num_parallel_workers)
    ds1 = ds1.map(input_columns="image", operations=resize_op,
                  num_parallel_workers=num_parallel_workers)
    ds1 = ds1.map(input_columns="image", operations=rescale_op,
                  num_parallel_workers=num_parallel_workers)
    ds1 = ds1.map(input_columns="image", operations=hwc2chw_op,
                  num_parallel_workers=num_parallel_workers)

    # apply DatasetOps
    buffer_size = 10000
    ds1 = ds1.shuffle(buffer_size=buffer_size)
    ds1 = ds1.batch(batch_size, drop_remainder=True)
    ds1 = ds1.repeat(repeat_size)

    return ds1
建立模型
这里以LeNet模型为例,您也可以建立训练自己的模型。
定义LeNet模型网络。
def conv(in_channels, out_channels, kernel_size, stride=1, padding=0):
    weight = weight_variable()
    return nn.Conv2d(in_channels, out_channels,
                     kernel_size=kernel_size, stride=stride, padding=padding,
                     weight_init=weight, has_bias=False, pad_mode="valid")


def fc_with_initialize(input_channels, out_channels):
    weight = weight_variable()
    bias = weight_variable()
    return nn.Dense(input_channels, out_channels, weight, bias)


def weight_variable():
    return TruncatedNormal(0.02)


class LeNet5(nn.Cell):
    """
    Lenet network
    """
    def __init__(self):
        super(LeNet5, self).__init__()
        self.conv1 = conv(1, 6, 5)
        self.conv2 = conv(6, 16, 5)
        self.fc1 = fc_with_initialize(16*5*5, 120)
        self.fc2 = fc_with_initialize(120, 84)
        self.fc3 = fc_with_initialize(84, 10)
        self.relu = nn.ReLU()
        self.max_pool2d = nn.MaxPool2d(kernel_size=2, stride=2)
        self.flatten = nn.Flatten()

    def construct(self, x):
        x = self.conv1(x)
        x = self.relu(x)
        x = self.max_pool2d(x)
        x = self.conv2(x)
        x = self.relu(x)
        x = self.max_pool2d(x)
        x = self.flatten(x)
        x = self.fc1(x)
        x = self.relu(x)
        x = self.fc2(x)
        x = self.relu(x)
        x = self.fc3(x)
        return x
加载预训练的LeNet模型,您也可以训练并保存自己的MNIST模型,参考快速入门。利用上面定义的数据加载函数
generate_mnist_dataset载入数据。ckpt_name = './trained_ckpt_file/checkpoint_lenet-10_1875.ckpt' net = LeNet5() load_dict = load_checkpoint(ckpt_name) load_param_into_net(net, load_dict) # get test data data_list = "./MNIST_unzip/test" batch_size = 32 dataset = generate_mnist_dataset(data_list, batch_size, sparse=False)
测试模型。
# prediction accuracy before attack
model = Model(net)
batch_num = 3  # the number of batches of attacking samples
test_images = []
test_labels = []
predict_labels = []
i = 0
for data in dataset.create_tuple_iterator():
    i += 1
    images = data[0].astype(np.float32)
    labels = data[1]
    test_images.append(images)
    test_labels.append(labels)
    pred_labels = np.argmax(model.predict(Tensor(images)).asnumpy(),
                            axis=1)
    predict_labels.append(pred_labels)
    if i >= batch_num:
        break
predict_labels = np.concatenate(predict_labels)
true_labels = np.argmax(np.concatenate(test_labels), axis=1)
accuracy = np.mean(np.equal(predict_labels, true_labels))
LOGGER.info(TAG, "prediction accuracy before attacking is : %s", accuracy)
测试结果中分类精度达到了98%。
prediction accuracy before attacking is : 0.9895833333333334
对抗性攻击
调用MindArmour提供的FGSM接口(FastGradientSignMethod)。
# attacking
attack = FastGradientSignMethod(net, eps=0.3)
start_time = time.clock()
adv_data = attack.batch_generate(np.concatenate(test_images),
                                 np.concatenate(test_labels), batch_size=32)
stop_time = time.clock()
np.save('./adv_data', adv_data)
pred_logits_adv = model.predict(Tensor(adv_data)).asnumpy()
# rescale predict confidences into (0, 1).
pred_logits_adv = softmax(pred_logits_adv, axis=1)
pred_labels_adv = np.argmax(pred_logits_adv, axis=1)
accuracy_adv = np.mean(np.equal(pred_labels_adv, true_labels))
LOGGER.info(TAG, "prediction accuracy after attacking is : %s", accuracy_adv)
attack_evaluate = AttackEvaluate(np.concatenate(test_images).transpose(0, 2, 3, 1),
                                 np.concatenate(test_labels),
                                 adv_data.transpose(0, 2, 3, 1),
                                 pred_logits_adv)
LOGGER.info(TAG, 'mis-classification rate of adversaries is : %s',
            attack_evaluate.mis_classification_rate())
LOGGER.info(TAG, 'The average confidence of adversarial class is : %s',
            attack_evaluate.avg_conf_adv_class())
LOGGER.info(TAG, 'The average confidence of true class is : %s',
            attack_evaluate.avg_conf_true_class())
LOGGER.info(TAG, 'The average distance (l0, l2, linf) between original '
            'samples and adversarial samples are: %s',
            attack_evaluate.avg_lp_distance())
LOGGER.info(TAG, 'The average structural similarity between original '
            'samples and adversarial samples are: %s',
            attack_evaluate.avg_ssim())
LOGGER.info(TAG, 'The average costing time is %s',
            (stop_time - start_time)/(batch_num*batch_size))
攻击结果如下:
prediction accuracy after attacking is : 0.052083
mis-classification rate of adversaries is : 0.947917
The average confidence of adversarial class is : 0.803375
The average confidence of true class is : 0.042139
The average distance (l0, l2, linf) between original samples and adversarial samples are: (1.698870, 0.465888, 0.300000)
The average structural similarity between original samples and adversarial samples are: 0.332538
The average costing time is 0.003125
对模型进行FGSM无目标攻击后,模型精度由98.9%降到5.2%,误分类率高达95%,成功攻击的对抗样本的预测类别的平均置信度(ACAC)为 0.803375,成功攻击的对抗样本的真实类别的平均置信度(ACTC)为 0.042139,同时给出了生成的对抗样本与原始样本的零范数距离、二范数距离和无穷范数距离,平均每个对抗样本与原始样本间的结构相似性为0.332538,平均每生成一张对抗样本所需时间为0.003125s。
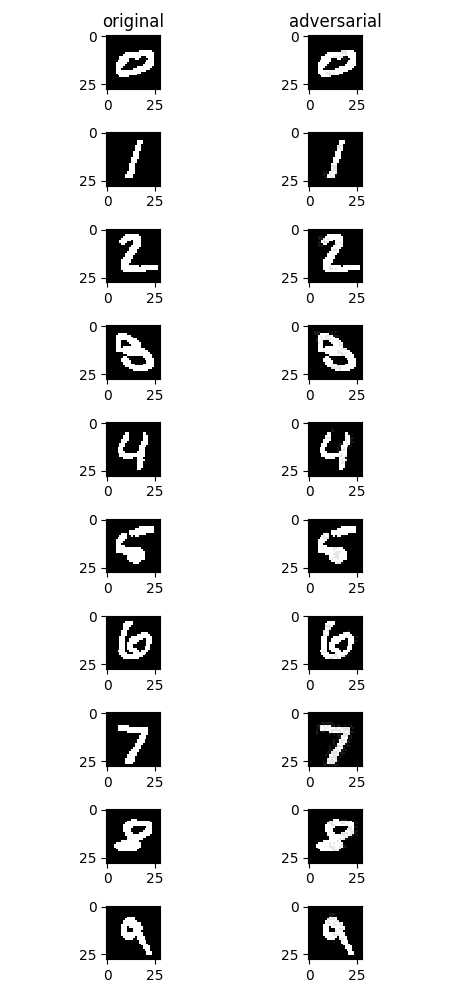
攻击前后效果如下图,左侧为原始样本,右侧为FGSM无目标攻击后生成的对抗样本。从视觉角度而言,右侧图片与左侧图片几乎没有明显变化,但是均成功误导了模型,使模型将其误分类为其他非正确类别。

对抗性防御
NaturalAdversarialDefense(NAD)是一种简单有效的对抗样本防御方法,使用对抗训练的方式,在模型训练的过程中构建对抗样本,并将对抗样本与原始样本混合,一起训练模型。随着训练次数的增加,模型在训练的过程中提升对于对抗样本的鲁棒性。NAD算法使用FGSM作为攻击算法,构建对抗样本。
防御实现
调用MindArmour提供的NAD防御接口(NaturalAdversarialDefense)。
from mindspore.nn import SoftmaxCrossEntropyWithLogits
from mindarmour.defenses import NaturalAdversarialDefense


loss = SoftmaxCrossEntropyWithLogits(is_grad=False, sparse=False)
opt = nn.Momentum(net.trainable_params(), 0.01, 0.09)

nad = NaturalAdversarialDefense(net, loss_fn=loss, optimizer=opt,
                                bounds=(0.0, 1.0), eps=0.3)
net.set_train()
nad.batch_defense(np.concatenate(test_images), np.concatenate(test_labels),
                  batch_size=32, epochs=20)

# get accuracy of test data on defensed model
net.set_train(False)
acc_list = []
pred_logits_adv = []
for i in range(batch_num):
    batch_inputs = test_images[i]
    batch_labels = test_labels[i]
    logits = net(Tensor(batch_inputs)).asnumpy()
    pred_logits_adv.append(logits)
    label_pred = np.argmax(logits, axis=1)
    acc_list.append(np.mean(np.argmax(batch_labels, axis=1) == label_pred))
pred_logits_adv = np.concatenate(pred_logits_adv)
pred_logits_adv = softmax(pred_logits_adv, axis=1)

LOGGER.info(TAG, 'accuracy of TEST data on defensed model is : %s',
             np.mean(acc_list))
acc_list = []
for i in range(batch_num):
    batch_inputs = adv_data[i * batch_size: (i + 1) * batch_size]
    batch_labels = test_labels[i]
    logits = net(Tensor(batch_inputs)).asnumpy()
    label_pred = np.argmax(logits, axis=1)
    acc_list.append(np.mean(np.argmax(batch_labels, axis=1) == label_pred))

attack_evaluate = AttackEvaluate(np.concatenate(test_images),
                                 np.concatenate(test_labels),
                                 adv_data,
                                 pred_logits_adv)

LOGGER.info(TAG, 'accuracy of adv data on defensed model is : %s',
            np.mean(acc_list))
LOGGER.info(TAG, 'defense mis-classification rate of adversaries is : %s',
            attack_evaluate.mis_classification_rate())
LOGGER.info(TAG, 'The average confidence of adversarial class is : %s',
            attack_evaluate.avg_conf_adv_class())
LOGGER.info(TAG, 'The average confidence of true class is : %s',
            attack_evaluate.avg_conf_true_class())
LOGGER.info(TAG, 'The average distance (l0, l2, linf) between original '
            'samples and adversarial samples are: %s',
            attack_evaluate.avg_lp_distance())
防御效果
accuracy of TEST data on defensed model is : 0.974259
accuracy of adv data on defensed model is : 0.856370
defense mis-classification rate of adversaries is : 0.143629
The average confidence of adversarial class is : 0.616670
The average confidence of true class is : 0.177374
The average distance (l0, l2, linf) between original samples and adversarial samples are: (1.493417, 0.432914, 0.300000)
使用NAD进行对抗样本防御后,模型对于对抗样本的误分类率从95%降至14%,模型有效地防御了对抗样本。同时,模型对于原来测试数据集的分类精度达97%,使用NAD防御功能,并未降低模型的分类精度。