Whisper加速实战:教你用MindSpore Profiler为推理提速
Whisper加速实战:教你用MindSpore Profiler为推理提速
Whisper 是由 OpenAI 开发的多语言语音识别模型。一经开源受到开发者广泛关注和使用,在使用中遇到其耗时过高问题,一段 91 秒的音频,识别耗时长达 95 秒, 推理效率不足,难以满足实时应用需求。 本文将系统分享我们在MindSpore 2.5.0 + MindSpore NLP 0.4.0环境下,通过引入FlashAttention 2 与优化Conv1D,借助MindSpore Profiler[1]精准定位瓶颈,最终将Whisper模型推理耗时压缩至60秒以内的全过程。
目前该模型已上线模力方舟,点击阅读原文可直接体验。
https://ai.gitee.com/serverless-api/packages/1495?model=whisper-large-v3&package=1495
# 01
三种注意力机制对比
模式
特点
适用场景
Eager
直接计算完整注意力矩阵
短序列
SDPA
通过缩放点积计算注意力权重,引入部分显存优化
中等长度序列
FlashAttention2
通过“分块+重计算”,避免存储完整矩阵,大幅降低显存消耗
长序列任务
FlashAttention 2为何能加速?想象一下拼图游戏:
1. 切块处理:就像无法一次性处理超大图片,FA2将长序列切分成与硬件缓存匹配的“小拼图”分批处理,避免内存爆炸
2. 分块统计:在每个“小拼图”内,先扫描计算关键统计量(如最大值、归一化因子),相当于找出每块图像的“关键特征”
3. 按需重算:反向传播时,仅需保存少量统计量,按需重新计算中间结果,极大节省显存
这样的”分块处理+重计算“策略,显著降低了显存使用,提高了并行计算效率,特别适用于语音识别等需要处理超长序列的任务。
# 02
接入 FlashAttention2 模式
我们将FlashAttention 2集成MindSpore NLP中,具体流程[2]如下:
1、核心适配
- 移值flash-attn 库中处理填充(Padding)的关键函数 (index_put_first_axis, index_first_axis, unpad_input, pad_input)
- 新增modeling_flash_attention_utils.py模块,实现支撑FA2的辅助函数(如 _get_unpad_data, _flash_attention_forward等)
2、模型改造
- 在modeling_whisper.py中新增WhisperFlashAttention2模块
- 用户只需在初始化模型时设置attn_implementation="flash_attention_2" 即可启用FA2
3、初战告捷
91秒音频推理时间从95秒降至约85秒,性能提升约10%,但性能仍有优化空间。
# 03
Profiler精准定位瓶颈:Conv1D成“罪魁祸首”
初步优化后性能仍有瓶颈?MindSpore Profiler成为关键突破口!
1、Profiler: 性能瓶颈的“显微镜”
- 功能强大:MindSpore官方提供的性能调优利器,能够对神经网络的各个环节进行精细的性能采集和分析。
- 使用便捷:只需先创建并初始化Profiler对象,设置采集级别和调度策略,然后在推理过程中自动收集数据:
import mindspore
from mindspore.profiler import ProfilerLevel, schedule, tensorboard_trace_handler
experimental_config = mindspore.profiler._ExperimentalConfig(
                            profiler_level=ProfilerLevel.Level0,
                            aic_metrics=AicoreMetrics.AiCoreNone,
                            l2_cache=False,
                            mstx=False,
                            data_simplification=False,
                            export_type=[ExportType.Text])
# Profiler 数据默认存储在路径:
# ./data/modelfoundry-prod-node-xxx/ASCEND_PROFILER_OUTPUT
with mindspore.profiler.profile(
    activities=[ProfilerActivity.CPU, ProfilerActivity.NPU],
    schedule=mindspore.profiler.schedule(wait=0, warmup=0, active=1, repeat=1, skip_first=0),
    on_trace_ready=mindspore.profiler.tensorboard_trace_handler("./data"),
    profile_memory=False,
    experimental_config=experimental_config
    ) as prof:
    # 运行你的推理代码 (pipe(audio_file))
    prof.step()
- 可视化分析:使用**MindStudio Insight[3]**或浏览器内置的Trace Viewer分析生成的timeline文件
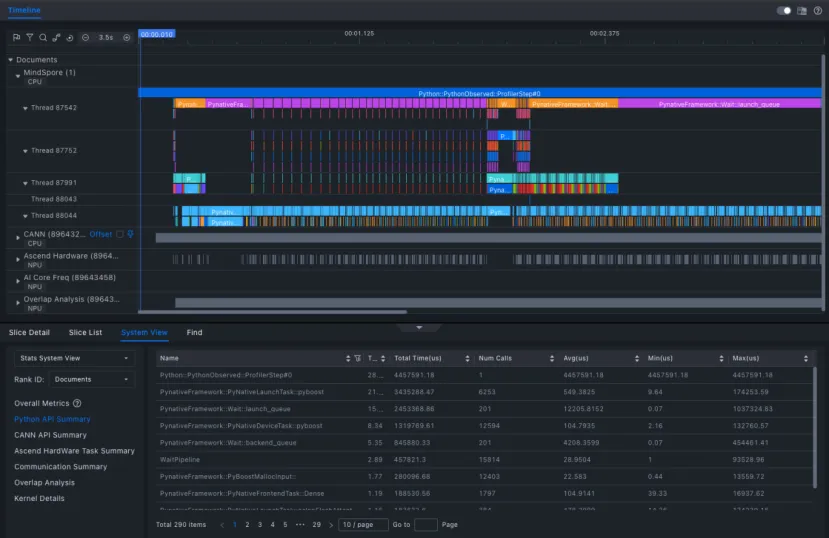
2、性能瓶颈:低效的Conv1D实现
使用 MindStudio Insight(版本 8.0.RC1) 对 timeline 文件进行分析后,可清晰定位性能瓶颈:
- 瓶颈算子:Conv1D
- 问题根源:旧版本MindSpore (<=2.5.0)的Conv1D是通过Conv2D间接模拟实现的:
1)存在多余的维度转换操作
2)计算主要在 CPU上执行,无法利用NPU加速
3)导致频繁的内存拷贝,拖累整体速度

3、解决方案:引入高效 Conv1D 实现
自 MindSpore 2.6.0 起,框架已提供更高效的 Conv1D 实现,支持图模式和硬件加速。将框架升级到MindSpore 2.6.0并适配新版的Conv1D后,结合之前集成的FlashAttention 2:
- 推理耗时由原来的95秒优化至平均60秒内
- 相比原始版本提升超过35%
- CPU占用显著下降,资源利用更高效
# 04
手把手推理教程
想亲身体验优化后的超快Whisper?跟着以下步骤操作:
1、下载镜像
执行以下Shell命令,拉取MindSpore官方容器镜像:
docker pull quay.io/ascend/mindspore:openeuler-python3.10-cann8.1.rc1-mindspore2.6.0rc1
2、创建并进入容器
执行以下命令创建容器,name 设置为 whisper:
docker run -itd --privileged  --name=whisper --net=host \
   --shm-size 500g \
   --device=/dev/davinci0 \
   --device=/dev/davinci1 \
   --device=/dev/davinci2 \
   --device=/dev/davinci3 \
   --device=/dev/davinci4 \
   --device=/dev/davinci5 \
   --device=/dev/davinci6 \
   --device=/dev/davinci7 \
   --device=/dev/davinci_manager \
   --device=/dev/hisi_hdc \
   --device /dev/devmm_svm \
   -v /usr/local/Ascend/driver:/usr/local/Ascend/driver \
   -v /usr/local/Ascend/firmware:/usr/local/Ascend/firmware \
   -v /usr/local/sbin/npu-smi:/usr/local/sbin/npu-smi \
   -v /usr/local/sbin:/usr/local/sbin \
   -v /etc/hccn.conf:/etc/hccn.conf \
   quay.io/ascend/mindspore:openeuler-python3.10-cann8.1.rc1-mindspore2.6.0rc1 \
   bash
进入容器,后续所有操作均在容器内操作。
docker exec -it whisper bash
3、安装 MindSpore NLP 与依赖
执行以下脚本,安装 MindSpore NLP 及相关依赖包:
# 安装相关依赖
yum install ffmpeg git
# 配置国内源
pip config set global.index-url https://repo.huaweicloud.com/repository/pypi/simple/
# 升级pip
pip install --upgrade pip
# 安装mindnlp
git clone -b 0.4 https://github.com/mindspore-lab/mindnlp.git
cd mindnlp
bash scripts/build_and_reinstall.sh
4、推理代码示例
import mindspore
from mindnlp.transformers import AutoModelForSpeechSeq2Seq, AutoProcessor, pipeline

# 国内可设置HF镜像 (可选)
import os
os.environ['HF_ENDPOINT'] = "https://hf-mirror.com"

# 加载模型与处理器,启用FlashAttention 2
model_id = "openai/whisper-large-v3"
model = AutoModelForSpeechSeq2Seq.from_pretrained(
    model_id,
    ms_dtype=mindspore.float16,
    low_cpu_mem_usage=True,
    use_safetensors=True,
    attn_implementation="flash_attention_2",
)
processor = AutoProcessor.from_pretrained(model_id)

# 创建推理管道
pipe = pipeline(
    "automatic-speech-recognition",
    model=model,
    tokenizer=processor.tokenizer,
    feature_extractor=processor.feature_extractor,
    ms_dtype=mindspore.float16,
    return_timestamps=True,
)

# 执行推理
audio_file = "/path/to/your/audio.mp3" # 替换为你的音频文件路径
result = pipe(audio_file)
print(result["text"])    # 打印识别结果
引用
[1] MindSpore 性能采集工具 Profiler:
https://www.mindspore.cn/docs/zh-CN/r2.6.0/api\_python/mindspore/mindspore.Profiler.html
[2] Whisper接入FlashAttention2 流程: https://github.com/mindspore-lab/mindnlp/pull/2018
[3] MindStudio Insight工具下载:
https://www.hiascend.com/developer/download/community/result?module=sto