Using CV Explainers
![]()
What are CV Explainers
Explainers are algorithms explaining the decisions made by AI models. MindSpore XAI currently provides 7 explainers for image classification scenario. Saliency maps (or heatmaps) are the outputs, their brightness represents the importance of the corresponding regions on the original image.
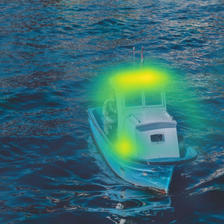
A saliency map overlay on top of the original image:
There are 2 categories of explainers: gradient based and perturbation based. The gradient based explainers rely on the backpropagation method to compute the pixel importance while the perturbation based explainers exploit random perturbations on the original images.
Explainer |
Category |
|---|---|
Gradient |
gradient |
GradCAM |
gradient |
GuidedBackprop |
gradient |
Deconvolution |
gradient |
Occlusion |
perturbation |
RISE |
perturbation |
RISEPlus |
perturbation |
Preparations
Downloading Data Package
First of all, we have to download the data package and put it underneath the xai/examples/ directory of a local XAI source package:
wget https://mindspore-website.obs.myhuaweicloud.com/notebook/datasets/xai/xai_examples_data.tar.gz
tar -xf xai_examples_data.tar.gz

git clone https://gitee.com/mindspore/xai
mv xai_examples_data xai/examples/
xai/examples/ files:
xai/examples/
├── xai_examples_data/
│    ├── ckpt/
│    │    ├── resent50.ckpt
│    ├── train/
│    └── test/
├── common/
│    ├── dataset.py
│    └── resnet.py
├── using_cv_explainers.py
├── using_rise_plus.py
└── using_cv_benchmarks.py
xai_examples_data/: The extracted data package.xai_examples_data/ckpt/resent50.ckpt: ResNet50 checkpoint file.xai_examples_data/test: Test dataset.xai_examples_data/train: Training dataset.common/dataset.py: Dataset loader.common/resnet.py: ResNet model definitions.using_cv_explainers.py: Example of using explainers.using_rise_plus.py: Example of using RISEPlus explainer.using_cv_benchmarks.py: Example of using benchmarks.
Preparing Python Environment
The complete code of the tutorial below is using_cv_explainers.py.
In order to explain an image classification predication, we have to have a trained CNN network (nn.Cell) and an image to be examined:
# have to change the current directory to xai/examples/ first
import mindspore as ms
from common.resnet import resnet50
from common.dataset import load_image_tensor

# only PYNATIVE_MODE is supported
ms.set_context(mode=ms.PYNATIVE_MODE)

# 20 classes
num_classes = 20

# load the trained classifier
net = resnet50(num_classes)
param_dict = ms.load_checkpoint("xai_examples_data/ckpt/resnet50.ckpt")
ms.load_param_into_net(net, param_dict)

# [1, 3, 224, 224] Tensor
boat_image = load_image_tensor("xai_examples_data/test/boat.jpg")
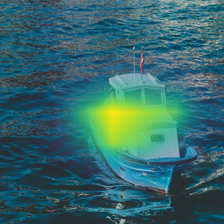
Using GradCAM
GradCAM is a typical and effective gradient based explainer:
from PIL import Image
import mindspore as ms
from mindspore_xai.explainer import GradCAM
from mindspore_xai.visual.cv import saliency_to_image

# usually specify the last convolutional layer
grad_cam = GradCAM(net, layer="layer4")

# 3 is the class id of 'boat'
saliency = grad_cam(boat_image, targets=3, show=False)

# convert the saliency map to a PIL.Image.Image object
boat_img = Image.open("xai_examples_data/test/boat.jpg")
saliency_to_image(saliency, boat_img)
The returned saliency is a 1x1x224x224 tensor for an 1xCx224x224 image tensor, which stores all pixel importances (range:[0.0, 1.0]) to the classification decision of ‘boat’. Users may specify any class to be explained.
Batch Explanation
For gradient based explainers, batch explanation is usually more efficient. Other explainers may also batch the evaluations:
from common.dataset import load_dataset

test_ds = load_dataset('xai_examples_data/test').batch(4)

for images, labels in test_ds:
    saliencies = grad_cam(images, targets=ms.Tensor([3, 3, 3, 3], dtype=ms.int32))
    # other custom operations ...
The returned saliencies is a 4x1x224x224 tensor for a 4xCx224x224 batched image tensor.
Using Other Explainers
The ways of using other explainers are very similar to GradCAM, except RISEPlus.
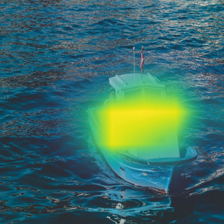
Using RISEPlus
The complete code of the tutorial below is using_rise_plus.py.
RISEPlus is based on RISE with an introduction of Out-of-Distribution(OoD) detector. It solves the degeneration problem of RISE on samples that the classifier had never seem the similar in training.
First, we need to train an OoD detector(OoDNet) with the classifier training dataset:
# have to change the current directory to xai/examples/ first
import mindspore as ms
from mindspore.nn import Softmax, SoftmaxCrossEntropyWithLogits
from mindspore_xai.tool.cv import OoDNet
from mindspore_xai.explainer import RISEPlus
from common.dataset import load_dataset
from common.resnet import resnet50

# only PYNATIVE_MODE is supported
ms.set_context(mode=ms.PYNATIVE_MODE)

num_classes = 20

# classifier training dataset
train_ds = load_dataset('xai_examples_data/train').batch(4)

# load the trained classifier
net = resnet50(num_classes)
param_dict = ms.load_checkpoint('xai_examples_data/ckpt/resnet50.ckpt')
ms.load_param_into_net(net, param_dict)

ood_net = OoDNet(underlying=net, num_classes=num_classes)

# use SoftmaxCrossEntropyWithLogits as loss function if the activation function of
# the classifier is Softmax, use BCEWithLogitsLoss if the activation function is Sigmoid
ood_net.train(train_ds, loss_fn=SoftmaxCrossEntropyWithLogits())

ms.save_checkpoint(ood_net, 'ood_net.ckpt')
The classifier for OoDNet must be a subclass of nn.Cell, in __init__() which must:
defines an
intmember attribute namednum_featuresas the number of feature values to be returned by the feature layer.defines a
boolmember attribute namedoutput_featureswithFalseas initial value, OoDNet tells the classifier to return the feature tensor inconstruct()by settingoutput_featurestoTrue.
A LeNet5 example of underlying classifier:
from mindspore import nn
from mindspore.common.initializer import Normal

class MyLeNet5(nn.Cell):

    def __init__(self, num_class, num_channel):
        super(MyLeNet5, self).__init__()

        # must add the following 2 attributes to your model
        self.num_features = 84 # no. of features, int
        self.output_features = False # output features flag, bool

        self.conv1 = nn.Conv2d(num_channel, 6, 5, pad_mode='valid')
        self.conv2 = nn.Conv2d(6, 16, 5, pad_mode='valid')
        self.relu = nn.ReLU()
        self.max_pool2d = nn.MaxPool2d(kernel_size=2, stride=2)
        self.flatten = nn.Flatten()
        self.fc1 = nn.Dense(16 * 5 * 5, 120, weight_init=Normal(0.02))
        self.fc2 = nn.Dense(120, self.num_features, weight_init=Normal(0.02))
        self.fc3 = nn.Dense(self.num_features, num_class, weight_init=Normal(0.02))

    def construct(self, x):
        x = self.conv1(x)
        x = self.relu(x)
        x = self.max_pool2d(x)
        x = self.conv2(x)
        x = self.relu(x)
        x = self.max_pool2d(x)
        x = self.flatten(x)
        x = self.relu(self.fc1(x))
        x = self.relu(self.fc2(x))

        # return the features tensor if output_features is True
        if self.output_features:
            return x

        x = self.fc3(x)
        return x
Now we can use RISEPlus with the trained OoDNet:
from PIL import Image
from mindspore_xai.visual.cv import saliency_to_image

# create a new classifier as the underlying when loading OoDNet from a checkpoint
ood_net = OoDNet(underlying=resnet50(num_classes), num_classes=num_classes)
param_dict = ms.load_checkpoint('ood_net.ckpt')
ms.load_param_into_net(ood_net, param_dict)

rise_plus = RISEPlus(ood_net=ood_net, network=net, activation_fn=Softmax())
saliency = rise_plus(boat_image, targets=3, show=False)

boat_img = Image.open("xai_examples_data/test/boat.jpg")
saliency_to_image(saliency, boat_img)
The returned saliency is an 1x1x224x224 tensor for an 1xCx224x224 image tensor.