数据操作/数据变换
![]()
![]()
![]()
数据操作
mindspore.dataset 提供了一系列的数据集操作,用户通过这些数据集操作,如 .shuffle / .filter /
.skip / .take /
.batch / … 来实现数据集的进一步混洗、过滤、跳过、批处理组合等功能。
常用数据变换操作包括:
.filter(...):通过指定条件,多数据进行过滤,保留满足预期条件的样本。.project(...):对多个数据列进行排序,或删除不需要的数据列。.rename(...): 对指定数据列进行重命名,便于标记数据特性。.shuffle(...): 划分一个数据缓冲区,对落入缓冲区的数据进行混洗。.skip(...): 跳过数据集的前n条样本。.take(...): 只获取数据集的前n条样本。.map(...):数据变换,通过自定义方法对每个样本进行变换增强。.batch(...):对batch_size条数据进行组合。
下面将通过示例代码展示filter、skip、batch数据操作。
[1]:
from mindspore.dataset import GeneratorDataset

# Random-accessible object as input source
class MyDataset:
    def __init__(self):
        self._data = [1, 2, 3, 4, 5, 6]
    def __getitem__(self, index):
        return self._data[index]
    def __len__(self):
        return len(self._data)

loader = MyDataset()

# find sampler which value < 4
dataset = GeneratorDataset(source=loader, column_names=["data"], shuffle=False)
filtered_dataset = dataset.filter(lambda x: x < 4, input_columns=["data"])
print("filtered_dataset", list(filtered_dataset))

# skip dirst 3 samples
dataset = GeneratorDataset(source=loader, column_names=["data"], shuffle=False)
skipped_dataset = dataset.skip(3)
print("skipped_dataset", list(skipped_dataset))

# batch the dataset by batch_size=2
dataset = GeneratorDataset(source=loader, column_names=["data"], shuffle=False)
batched_dataset = dataset.batch(2, num_parallel_workers=1)
print("batched_dataset", list(batched_dataset))
filtered_dataset [[Tensor(shape=[], dtype=Int64, value= 1)], [Tensor(shape=[], dtype=Int64, value= 2)], [Tensor(shape=[], dtype=Int64, value= 3)]]
skipped_dataset [[Tensor(shape=[], dtype=Int64, value= 4)], [Tensor(shape=[], dtype=Int64, value= 5)], [Tensor(shape=[], dtype=Int64, value= 6)]]
batched_dataset [[Tensor(shape=[2], dtype=Int64, value= [1, 2])], [Tensor(shape=[2], dtype=Int64, value= [3, 4])], [Tensor(shape=[2], dtype=Int64, value= [5, 6])]]
除此之外,还有数据集组合、切分、保存等操作。
数据集组合
数据集组合可以将多个数据集以串联/并朕的方式组合起来,形成一个全新的dataset对象。
[2]:
import mindspore.dataset as ds

ds.config.set_seed(1234)

# concat same column of two datasets
data = [1, 2, 3]
dataset1 = ds.NumpySlicesDataset(data=data, column_names=["column_1"])

data = [4, 5, 6]
dataset2 = ds.NumpySlicesDataset(data=data, column_names=["column_1"])

dataset = dataset1.concat(dataset2)
for item in dataset.create_dict_iterator():
    print("concated dataset", item)


# zip different columns of two datasets
data = [1, 2, 3]
dataset1 = ds.NumpySlicesDataset(data=data, column_names=["column_1"])

data = [4, 5, 6]
dataset2 = ds.NumpySlicesDataset(data=data, column_names=["column_2"])

dataset = dataset1.zip(dataset2)
for item in dataset.create_dict_iterator():
    print("zipped dataset", item)
concated dataset {'column_1': Tensor(shape=[], dtype=Int64, value= 2)}
concated dataset {'column_1': Tensor(shape=[], dtype=Int64, value= 3)}
concated dataset {'column_1': Tensor(shape=[], dtype=Int64, value= 1)}
concated dataset {'column_1': Tensor(shape=[], dtype=Int64, value= 5)}
concated dataset {'column_1': Tensor(shape=[], dtype=Int64, value= 6)}
concated dataset {'column_1': Tensor(shape=[], dtype=Int64, value= 4)}
zipped dataset {'column_1': Tensor(shape=[], dtype=Int64, value= 2), 'column_2': Tensor(shape=[], dtype=Int64, value= 5)}
zipped dataset {'column_1': Tensor(shape=[], dtype=Int64, value= 3), 'column_2': Tensor(shape=[], dtype=Int64, value= 6)}
zipped dataset {'column_1': Tensor(shape=[], dtype=Int64, value= 1), 'column_2': Tensor(shape=[], dtype=Int64, value= 4)}
数据集切分
将数据集切分成训练数据集和验证数据集,分别用于训练过程和验证过程。
[3]:
import mindspore.dataset as ds

data = [1, 2, 3, 4, 5, 6]
dataset = ds.NumpySlicesDataset(data=data, column_names=["column_1"], shuffle=False)

train_dataset, eval_dataset = dataset.split([4, 2])

print(">>>> train dataset >>>>")
for item in train_dataset.create_dict_iterator():
    print(item)

print(">>>> eval dataset >>>>")
for item in eval_dataset.create_dict_iterator():
    print(item)
>>>> train dataset >>>>
{'column_1': Tensor(shape=[], dtype=Int64, value= 6)}
{'column_1': Tensor(shape=[], dtype=Int64, value= 4)}
{'column_1': Tensor(shape=[], dtype=Int64, value= 1)}
{'column_1': Tensor(shape=[], dtype=Int64, value= 5)}
>>>> eval dataset >>>>
{'column_1': Tensor(shape=[], dtype=Int64, value= 3)}
{'column_1': Tensor(shape=[], dtype=Int64, value= 2)}
数据集保存
将数据集重新保存到MindRecord数据格式。
[4]:
import os
import mindspore.dataset as ds

ds.config.set_seed(1234)

data = [1, 2, 3, 4, 5, 6]
dataset = ds.NumpySlicesDataset(data=data, column_names=["column_1"])

if os.path.exists("./train_dataset.mindrecord"):
    os.remove("./train_dataset.mindrecord")
if os.path.exists("./train_dataset.mindrecord.db"):
    os.remove("./train_dataset.mindrecord.db")

dataset.save("./train_dataset.mindrecord")
数据变换
通常情况下,直接加载的原始数据并不能直接送入神经网络进行训练,此时我们需要对其进行数据预处理。 MindSpore提供不同种类的数据变换(Transforms),配合数据处理Pipeline来实现数据预处理。
这些变换通常有2种使用方法,分别为“基于数据操作map进行数据变换”与“轻量化数据变换”,下面分别进行介绍。
基于map数据操作进行数据变换
mindspore.dataset提供了面向图像、文本、音频等不同数据类型的内置数据变换操作,所有的变换均可传到的map操作中,通过map方法自动对每条样本进行变换。除了内置的数据变换外,
map操作也可以执行用户自定义的变换操作。
[5]:
# Download data from open datasets
from download import download
from mindspore.dataset import MnistDataset
import mindspore.dataset.vision as vision

url = "https://mindspore-website.obs.cn-north-4.myhuaweicloud.com/" \
      "notebook/datasets/MNIST_Data.zip"
path = download(url, "./", kind="zip", replace=True)

# create MNIST loader
train_dataset = MnistDataset("MNIST_Data/train", shuffle=False)

# resize samples to (64, 64) using built-in transformation
train_dataset = train_dataset.map(operations=[vision.Resize((64, 64))],
                                  input_columns=['image'])

for data in train_dataset:
    print(data[0].shape, data[0].dtype)
    break
Downloading data from https://mindspore-website.obs.cn-north-4.myhuaweicloud.com/notebook/datasets/MNIST_Data.zip (10.3 MB)

file_sizes: 100%|██████████████████████████| 10.8M/10.8M [00:01<00:00, 6.99MB/s]
Extracting zip file...
Successfully downloaded / unzipped to ./
(64, 64, 1) UInt8
[6]:
# create MNIST loader
train_dataset = MnistDataset("MNIST_Data/train", shuffle=False)

def transform(img):
    img = img / 255.0
    return img

# apply normalize using customized transformation
train_dataset = train_dataset.map(operations=[transform],
                                  input_columns=['image'])

for data in train_dataset:
    print(data[0].shape, data[0].dtype)
    break
(28, 28, 1) Float64
轻量化数据变换
MindSpore提供了一种轻量化的数据处理执行方式,称为Eager模式。
在Eager模式下,是以函数式调用的方式执行Transforms。因此代码编写会更为简洁且能立即执行得到运行结果,推荐在小型数据变换实验、模型推理等轻量化场景中使用。

MindSpore目前支持在Eager模式执行各种Transform,具体如下所示,更多数据变换接口参见API文档。
vision模块,基于OpenCV/Pillow实现的数据变换。
text模块,基于Jieba/ICU4C等库实现的数据变换。
audio模块,基于C++实现的数据变换。
transforms模块,基于C++/Python/NumPy实现的通用数据变换。
下面将简要介绍各Transforms模块的Eager模式使用方法。使用Eager模式,只需要将Transform本身当成可执行函数即可。
数据准备
以下示例代码将图片数据下载到指定位置。
[7]:
from download import download

url = "https://mindspore-website.obs.cn-north-4.myhuaweicloud.com/notebook/datasets/banana.jpg"
download(url, './banana.jpg', replace=True)
Downloading data from https://mindspore-website.obs.cn-north-4.myhuaweicloud.com/notebook/datasets/banana.jpg (17 kB)

file_sizes: 100%|██████████████████████████| 17.1k/17.1k [00:00<00:00, 2.14MB/s]
Successfully downloaded file to ./banana.jpg
[7]:
'./banana.jpg'
vision
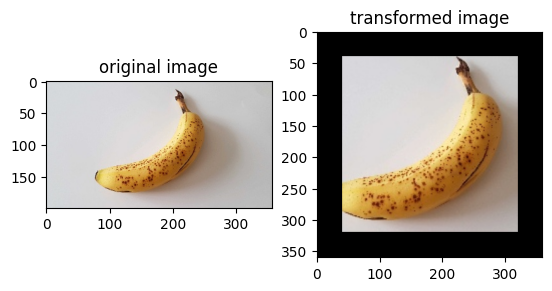
此示例将使用mindspore.dataset.vision模块中的Transform,对给定图像进行变换。
Vision Transform的Eager模式支持numpy.array或PIL.Image类型的数据作为入参。更多示例请参考:样例库
[8]:
import numpy as np
from PIL import Image
import matplotlib.pyplot as plt
import mindspore.dataset.vision as vision

img_ori = Image.open("banana.jpg").convert("RGB")
print("Image.type: {}, Image.shape: {}".format(type(img_ori), img_ori.size))

# Apply Resize to input immediately
op1 = vision.Resize(size=(320))
img = op1(img_ori)
print("Image.type: {}, Image.shape: {}".format(type(img), img.size))

# Apply CenterCrop to input immediately
op2 = vision.CenterCrop((280, 280))
img = op2(img)
print("Image.type: {}, Image.shape: {}".format(type(img), img.size))

# Apply Pad to input immediately
op3 = vision.Pad(40)
img = op3(img)
print("Image.type: {}, Image.shape: {}".format(type(img), img.size))

# Show the result
plt.subplot(1, 2, 1)
plt.imshow(img_ori)
plt.title("original image")
plt.subplot(1, 2, 2)
plt.imshow(img)
plt.title("transformed image")
plt.show()
Image.type: <class 'PIL.Image.Image'>, Image.shape: (356, 200)
Image.type: <class 'PIL.Image.Image'>, Image.shape: (569, 320)
Image.type: <class 'PIL.Image.Image'>, Image.shape: (280, 280)
Image.type: <class 'PIL.Image.Image'>, Image.shape: (360, 360)
text
此示例将使用text模块中Transforms,对给定文本进行变换。
Text Transforms的Eager模式支持numpy.array类型数据的作为入参。更多示例请参考:样例库
[9]:
import mindspore.dataset.text.transforms as text
import mindspore as ms

# Apply UnicodeCharTokenizer to input immediately
txt = "Welcome to Beijing !"
txt = text.UnicodeCharTokenizer()(txt)
print("Tokenize result: {}".format(txt))

# Apply ToNumber to input immediately
txt = ["123456"]
to_number = text.ToNumber(ms.int32)
txt = to_number(txt)
print("ToNumber result: {}, type: {}".format(txt, txt[0].dtype))
Tokenize result: ['W' 'e' 'l' 'c' 'o' 'm' 'e' ' ' 't' 'o' ' ' 'B' 'e' 'i' 'j' 'i' 'n' 'g'
 ' ' '!']
ToNumber result: [123456], type: int32
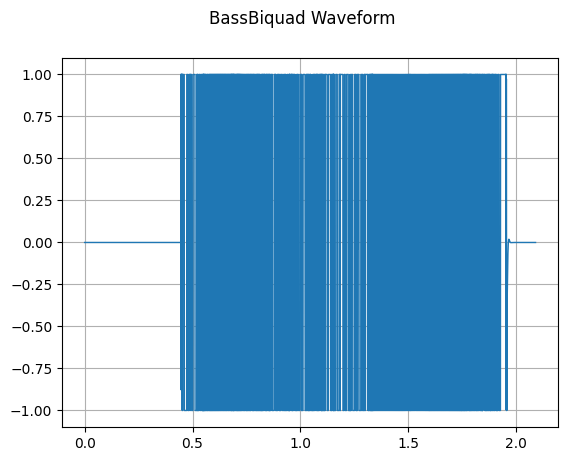
audio
此示例将使用audio模块中Transforms,对给定音频进行变换。
Audio Transforms的Eager模式支持numpy.array类型数据的作为入参。更多示例请参考:样例库
[10]:
import numpy as np
import matplotlib.pyplot as plt
import scipy.io.wavfile as wavfile
from download import download

import mindspore.dataset as ds
import mindspore.dataset.audio as audio

ds.config.set_seed(5)

# citation: LibriSpeech http://www.openslr.org/12
url = "https://mindspore-website.obs.cn-north-4.myhuaweicloud.com/notebook/datasets/84-121123-0000.wav"
download(url, './84-121123-0000.wav', replace=True)
wav_file = "84-121123-0000.wav"

def plot_waveform(waveform, sr, title="Waveform"):
    if waveform.ndim == 1:
        waveform = waveform[np.newaxis, :]
    num_channels, num_frames = waveform.shape
    time_axis = np.arange(0, num_frames) / sr

    figure, axes = plt.subplots(num_channels, 1)
    axes.plot(time_axis, waveform[0], linewidth=1)
    axes.grid(True)
    figure.suptitle(title)
    plt.show(block=False)
Downloading data from https://mindspore-website.obs.cn-north-4.myhuaweicloud.com/notebook/datasets/84-121123-0000.wav (65 kB)

file_sizes: 100%|███████████████████████████| 67.0k/67.0k [00:00<00:00, 756kB/s]
Successfully downloaded file to ./84-121123-0000.wav
BassBiquad 对输入的音频信号执行双极低搁架滤波器(two-pole low-shelf filter)。
[11]:
sample_rate, waveform = wavfile.read(wav_file)

bass_biquad = audio.BassBiquad(sample_rate, 10.0)
transformed_waveform = bass_biquad(waveform.astype(np.float32))
plot_waveform(transformed_waveform, sample_rate, title="BassBiquad Waveform")
transforms
此示例将使用transforms模块中通用Transform,对给定数据进行变换。
通用Transform的Eager模式支持numpy.array类型的数据作为入参。
[12]:
import numpy as np
import mindspore.dataset.transforms as trans

# Apply Fill to input immediately
data = np.array([1, 2, 3, 4, 5])
fill = trans.Fill(0)
data = fill(data)
print("Fill result: ", data)

# Apply OneHot to input immediately
label = np.array(2)
onehot = trans.OneHot(num_classes=5)
label = onehot(label)
print("OneHot result: ", label)
Fill result:  [0 0 0 0 0]
OneHot result:  [0 0 1 0 0]