MindSpore Case Study | Running YOLOv5 on Raspberry Pi for Real-Time Object Detection (3)
MindSpore Case Study | Running YOLOv5 on Raspberry Pi for Real-Time Object Detection (3)
In the previous blog, we used Python 3.7 for inference, but a graph build error is reported. As a result, we then used MindSpore APIs for MindIR inference.
import numpy as np
import cv2 as cv
import time
import numpy as np
import mindspore as ms
import mindspore.nn as nn
from mindspore import Tensor
from mindspore import context
context.set_context(mode=context.GRAPH_MODE)
graph = ms.load("yolov5s.mindir")
net = nn.GraphCell(graph)
in_data = cv.imread("C:\\ai\\infer\\data\\images\\dog.jpg")
img = cv.resize(in_data, (640,640), interpolation=cv.INTER_LINEAR)
image_np_expanded = img.astype('float32') / 255.0
input_tensor = Tensor(image_np_expanded)
print(input_tensor.shape)
img_dim=in_data.shape[:2]
output = net(input_tensor)
print(output[0].shape)
print(output[1].shape)
print(output[2].shape)
The shapes of the inference outputs are as follows:
(1, 20, 20, 3, 85)
(1, 40, 40, 3, 85)
(1, 80, 80, 3, 85)
The corresponding outputs are shown in the following figure, but there are slight differences, which is caused by different shapes of the input image.
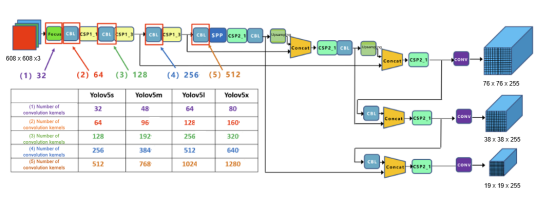
In the three feature maps in MindSpore, the largest shape is 80 x 80, indicating small object detection. For a 640 x 640 image, the receptive field of each pixel in the feature map is 640/80 = 8 x 8. 40 x 40 indicates medium object detection and 20 x 20 indicates large object detection.
Introduction to Output Object Border, Confidence, and Object Category
1. Output Object Border
Each layer of a feature map is convolved by 1 x 1 and generates multiple channels ((5 + number of categories) x 3). Additionally, each layer has three anchors, and each anchor corresponds to (5 + number of categories) channels. If the number of categories is 2, there are 7 channels in total, corresponding to xywh (four channels), confidence (one channel), and categories (two channels for two categories.)
Corresponding to the preceding output, the number of categories is 80, so the shape is 85.
xywh indicates object borders. However, x and y are not directly the coordinates of the center point of object borders, but the offsets relative to the upper left corner of the grid where object borders are located. Then, the relative value of the center point is mapped to the scale of the original image to obtain the final coordinates. Similarly, w and h are not width and height that directly predict object borders. Instead, the prediction is performed based on the anchor. The final width and height are equal to the predicted values multiplied by the width and height of the anchor.
2. Confidence
It indicates the confidence of the predicted object border. In the inference script, the final confidence is multiplied by the maximum category score.
3. Category
The number of additional channels is the same as the number of categories. Each additional channel indicates the probability of the corresponding category. During loss calculation, the value of the channel where the category corresponding to the tag is located is 1, and the values of other channels are 0. Then, the BCE loss can be calculated separately.
The next step is to process the output data. We can directly use APIs presented in process.py. For details, visit https://gitee.com/mindspore/models/blob/master/official/cv/YOLOv5/infer/sdk/api-server/postprocess.py.
img_dim = in_data.shape[:2]
from model_utils.config import config
from src.logger import get_logger
from postprocess import DetectionEngine
config.logger = get_logger(config.output_dir, 0)
# init detection engine
detection = DetectionEngine(config)
detection.detect(output,1,img_dim,139)
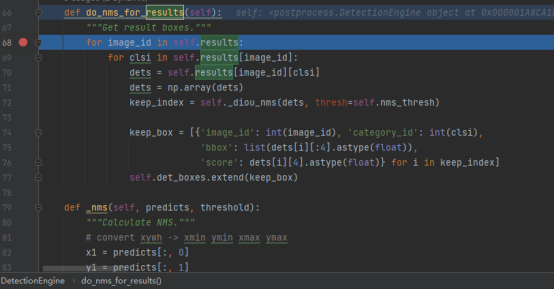
boxes=detection.do_nms_for_results()
print(boxes)
class DetectionEngine:
"""Detection engine."""
def __init__(self, args_detection):
self.ignore_threshold = args_detection.ignore_threshold
self.args = args_detection
self.labels = ['person', 'bicycle', 'car', 'motorcycle', 'airplane', 'bus', 'train', 'truck', 'boat',
'traffic light', 'fire hydrant', 'stop sign', 'parking meter', 'bench', 'bird', 'cat',
'dog', 'horse', 'sheep', 'cow', 'elephant', 'bear', 'zebra', 'giraffe', 'backpack',
'umbrella', 'handbag', 'tie', 'suitcase', 'frisbee', 'skis', 'snowboard', 'sports ball',
'kite', 'baseball bat', 'baseball glove', 'skateboard', 'surfboard', 'tennis racket',
'bottle', 'wine glass', 'cup', 'fork', 'knife', 'spoon', 'bowl', 'banana', 'apple',
'sandwich', 'orange', 'broccoli', 'carrot', 'hot dog', 'pizza', 'donut', 'cake', 'chair',
'couch', 'potted plant', 'bed', 'dining table', 'toilet', 'tv', 'laptop', 'mouse', 'remote',
'keyboard', 'cell phone', 'microwave', 'oven', 'toaster', 'sink', 'refrigerator', 'book',
'clock', 'vase', 'scissors', 'teddy bear', 'hair drier', 'toothbrush']
self.num_classes = len(self.labels)
self.results = {}
self.file_path = ''
self.ann_file = args_detection.val_ann_file
self._coco = COCO(self.ann_file)
self._img_ids = list(sorted(self._coco.imgs.keys()))
self.det_boxes = []
self.nms_thresh = args_detection.eval_nms_thresh
self.multi_label = args_detection.multi_label
self.multi_label_thresh = args_detection.multi_label_thresh
self.coco_catIds = [1, 2, 3, 4, 5, 6, 7, 8, 9, 10, 11, 13, 14, 15, 16, 17, 18, 19, 20, 21, 22, 23, 24, 25, 27,
28, 31, 32, 33, 34, 35, 36, 37, 38, 39, 40, 41, 42, 43, 44, 46, 47, 48, 49, 50, 51, 52, 53,
54, 55, 56, 57, 58, 59, 60, 61, 62, 63, 64, 65, 67, 70, 72, 73, 74, 75, 76, 77, 78, 79, 80,
81, 82, 84, 85, 86, 87, 88, 89, 90]
# Some parameters under DetectionEngine need to be configured. Therefore, we can directly use the parameters in model_utils.config.
After modifying parameters under DetectionEngine, we need to use the detect method for batch data processing. Since only one image is used as an example, the code can be modified as follows.
#ori_w, ori_h = img_shape[batch_id]
ori_w, ori_h = img_shape
#img_id = int(image_id[batch_id])
img_id = int(image_id)
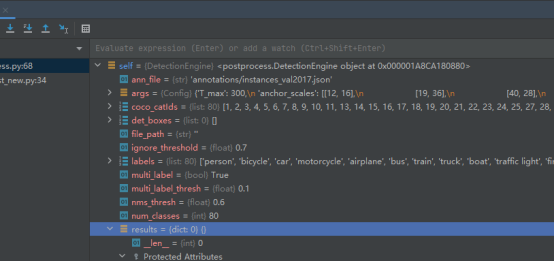
However, after code debugging, the value obtained by detect is null. This may be caused by model weights. After all, weight files may not be consistent.
To address this problem, we may use the MindSpore YOLO suite (MindYOLO), which was released in MindSpore 2.0. MindYOLO is a MindSpore-based algorithm suite for YOLO models. It incorporates various YOLO algorithm modules and provides common module interfaces (such as data processing, model building, and optimizer) of YOLO algorithms, simplifying model building and training processes. Currently, six basic models, including YOLOv3/v4/v5/v7/v8/X, are provided for quick reproduction and migration. For details about the code, visit https://github.com/mindspore-lab/mindyolo.
To be continued...