How to Use SynergyNet of MindSpore to Implement Facial Recognition Detection
How to Use SynergyNet of MindSpore to Implement Facial Recognition Detection
Background
Key Facial Point Detection
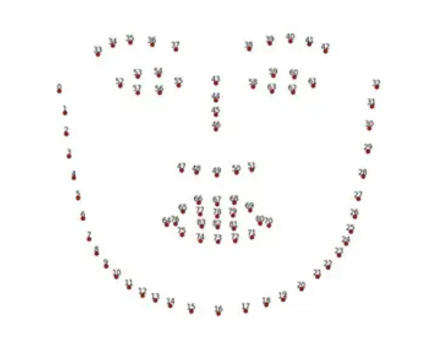
Key facial point detection refers to locating the key area of a given face, including eyebrows, eyes, nose, mouth, and face contour. It is a challenging task impacted by posture and blocking.
The set of key points is called a shape, which includes locations of the key points. The locations may be generally represented by either of the following: the position relative to the entire image; the position relative to the face bounding box (identifying the face in the entire image). The first shape is called an absolute shape with a range of [0, img_width] or [0, img_height]. The second shape is called a relative shape ranging from 0 to 1. The two shapes can transform to each other through the face bounding box.
Important application scenarios for key facial point detection:
· Face posture alignment: Facial recognition algorithms need to align face postures to improve model precision.
· Face beautification and modification: Accurately analyzes shapes of the face, eyes, and nose based on key points to modify specific facial positions, and provides entertainment functions such as face beautification and stickers.
· Facial expression analysis and mouth shape recognition: Analyzes facial expressions based on key points for interactive entertainment and behavior prediction.
Methods for detecting key facial points:
· Traditional method based on the active shape model (ASM) and active appearance model (AAM)
· Method based on cascade shape regression
· Method based on deep learning
Milestone algorithms for key facial points:
1. ASM of Cootes in 1995
2. AAM of Cootes in 1998
3. Constrained Local Model (CLM) of Ristinacce in 2006
4. Cascaded regression algorithm of Rollar in 2010
5. In 2013, Sun, who took the lead to apply CNN to facial key point positioning, pioneered facial key point detection based on deep learning.
Since the deep learning–based method is now the most widely used and achieved the highest effect precision, it becomes the focus of this blog.
Face Posture Estimation
The face posture estimation algorithm is mainly used to estimate the three-dimensional Euler angle of the input face block. Generally, a camera coordinate system is selected as the coordinate origins for reference. Posture estimation can be used in many service scenarios. For example, in a facial recognition system, it helps to filter input samples (generally, a front face is required to be recalled and recognized). In some scenarios where face orientation is crucial, such as looking-around detection in anti-fatigue driving products, face posture algorithms are indispensable.
1. Preparations
Installing MindSpore
conda create --name SynergyNet
conda activate SynergyNet
pip install MindSpore 1.8, Opencv, Scipy, Matplotlib, Cython
Preparing Data
300W-LP dataset:
https://github.com/cleardusk/3DDFA
AFLW2000-3D dataset:
Decompress the package and save it in the root directory. The format is as follows:
${root_dir}
 |--3dmm_data #training dataset
    |--train_aug_120x120
       |--AFWFlip_AFW_1051618982_1_0_1.jpg
       |--...
    |--BFM_UV.npy
    |--u_exp.npy
    |--...
 |--aflw2000_data #testing dataset
    |--AFLW2000-3D_crop
        |--image00002.jpg
        |--...
    |--eval
        |--AFLW2000-3D.pose.npy
        |--...
    |--AFLW2000-3D_crop.list
2. Algorithm Models
Representation Cycle
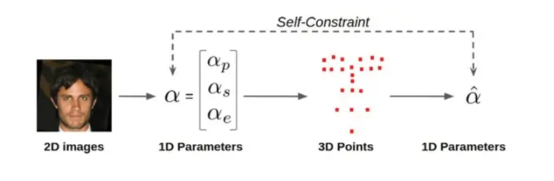
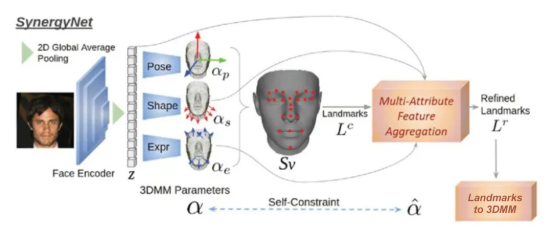
A representation cycle is created from the overall framework. First, the image encoder and the independent decoder regress the 1D parameters from the face image input. Construct a 3D grid according to the parameters and refine extracted 3D landmarks. In this step, 1D parameters are converted into 3D point representations in a forward direction. For the backward representation, a landmark is employed to the 3DMM module, switching from 3D points back to 1D parameters. Thus, a representation cycle is formed (Figure 4). We minimize the consistency loss to facilitate training.
_3D_attr, _3D_attr_GT, avgpool = self.I2P(x,target)
vertex_lmk1 = self.reconstruct_vertex_62(_3D_attr)
vertex_GT_lmk = self.reconstruct_vertex_62(_3D_attr_GT)

# global point feature
point_residual = self.forwardDirection(vertex_lmk1, avgpool, _3D_attr[:, 12:52], _3D_attr[:, 52:62])
# low-level point feature
vertex_lmk2 = vertex_lmk1 + 0.05 * point_residual
_3D_attr_S2 = self.reverseDirection(vertex_lmk2)
3D Morphable Models (3DMM)
3DMM is a general 3D face model that uses a fixed number of points to represent faces. The core idea is that faces can be matched one by one in the 3D space, and can be obtained by weighted linear addition of many other facial orthogonal bases. In the 3D space, each point (x, y, z) is actually obtained by adding weights of basis vectors in three directions: (1,0,0), (0,1,0), and (0,0,1). The weights are x, y, and z respectively.
Each face can be represented in a basis vector space formed by all faces in a database. Solving a face model equals solving a problem of coefficients of each basis vector. Basic attributes of a face include the shape and texture. Each face can be represented as a linear superposition of a shape vector and a texture vector.
self.feature_extractor = MobileNetV2()
self.last_channel = make_divisible(last_channel * max(1.0, alpha), round_nearest)

self.num_ori = 12
self.num_shape = 40
self.num_exp = 10

# building classifier(orientation/shape/expression)
self.classifier_ori = nn.SequentialCell(nn.Dropout(0.2),
 nn.Dense(self.last_channel, self.num_ori),)
self.classifier_shape = nn.SequentialCell(
 nn.Dropout(0.2), nn.Dense(self.last_channel, self.num_shape),)
self.classifier_exp = nn.SequentialCell(
 nn.Dropout(0.2),
 nn.Dense(self.last_channel, self.num_exp),)
self.pool = nn.AdaptiveAvgPool2d(1)
x = self.feature_extractor(x)
pool = self.pool(x)
x = pool.reshape(x.shape[0], -1)
avgpool = x
x_ori = self.classifier_ori(x)
x_shape = self.classifier_shape(x)
x_exp = self.classifier_exp(x)
concat_op = ops.Concat(1)
_3D_attr = concat_op((x_ori, x_shape, x_exp))
_3D_attr_GT = target
return _3D_attr, _3D_attr_GT, avgpool
3DMM to Refined 3D Landmarks
A refinement module that aggregates multi-attribute features is used to refine landmarks. A landmark can be regarded as a series of 3D points.
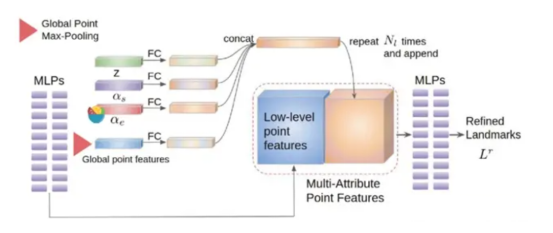
The refinement module is not improved using LC alone. Instead, multi-attribute feature aggregation (MAFA) is applied, covering input images and 3DMM semantics to provide information from different domains. For example, the shape contains information about the face thickness, and the expression contains information about eyebrows or oral movement. Such information can help regress a better landmark structure. MLPs are usually used to extract features from structured points. At bottlenecks, global point max-pooling is used to obtain global point features. The MLP decoder is then used to regress the attributes of each point.
# 3DMM Img
avgpool = other_input1
expand_dims = ops.ExpandDims()
avgpool = expand_dims(avgpool, 2)
avgpool = self.tile(avgpool, (1, 1, self.num_pts))

shape_code = other_input2
shape_code = expand_dims(shape_code, 2)
shape_code = self.tile(shape_code, (1, 1, self.num_pts))

expr_code = other_input3
expr_code = expand_dims(expr_code, 2)
expr_code = self.tile(expr_code, (1, 1, self.num_pts))

concat_op = ops.Concat(1)
cat_features = concat_op([point_features, global_features_repeated, avgpool, shape_code, expr_code])
Refined Landmarks to 3DMM
A landmark-to-3DMM module is constructed. The 3DMM parameters are regressed from the refined landmark using the overall landmark feature. The constructed module also contains an MLP decoder to extract high-dimensional point features, and adopts global point max-pooling to obtain the overall landmark feature. Then the FC layer converts the overall landmark feature into 3DMM parameters, including posture, shape and expression.
global_features = self.max_pool(out)

# Global point feature
out_rot =
self.relu(ops.Squeeze(-1)(self.bn6_1(ops.ExpandDims()(self.conv6_1(global_features), -1))))
out_shape =
self.relu(ops.Squeeze(-1)(self.bn6_2(ops.ExpandDims()(self.conv6_2(global_features), -1))))
out_expr =
self.relu(ops.Squeeze(-1)(self.bn6_3(ops.ExpandDims()(self.conv6_3(global_features), -1))))

concat_op = ops.Concat(1)
out = concat_op([out_rot, out_shape, out_expr])
squeeze = ops.Squeeze(2)
out = squeeze(out)
Code address: https://gitee.com/gai-shaoyan/mind3d
References
[1] C. -Y. Wu, Q. Xu and U. Neumann, "Synergy between 3DMM and 3D Landmarks for Accurate 3D Facial Geometry," 2021 International Conference on 3D Vision (3DV), 2021, pp. 453-463, doi: 10.1109/3DV53792.2021.00055.