MindSpore Case Study | An Example of Distributed Parallel Training on the CPU Platform
MindSpore Case Study | An Example of Distributed Parallel Training on the CPU Platform
Author: Yeats_Liao | Source: CSDN
This blog describes how to use MindSpore on the CPU platform. For the detailed code, go to the code repository.
- Setting Up the Environment
Go to the MindSpore official website and click Install.

Obtain the installation command.
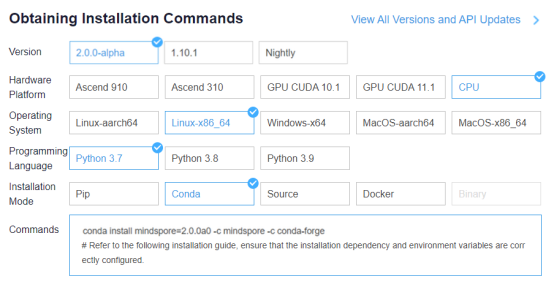
Open a terminal in ModelArts and enter the installation command.
conda install mindspore=2.0.0a0 -c mindspore -c conda-forge
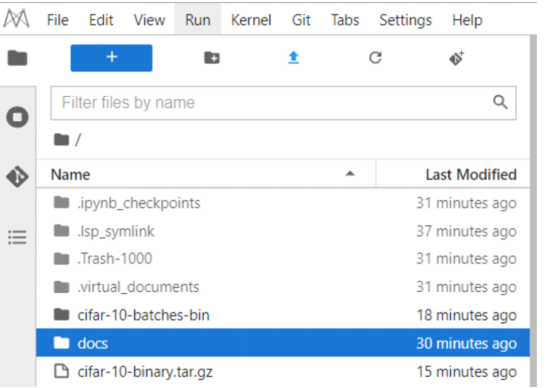
Click Clone a Repository in the sidebar and input the following URL.
https://gitee.com/mindspore/docs.git
The docs project is imported successfully.
- Preparations
2.1 Downloading a Dataset
This example uses the CIFAR-10 dataset, which consists of 10 types of 32 x 32 color images, with each type containing 6,000 images. The training dataset contains 50,000 images, and the test dataset 10,000 images.
Upload the downloaded dataset and decompress it to obtain the cifar-10-batches-bin folder.
The mindspore.dataset module provides multiple transforms for different data types such as images, texts, and audios, and supports Lambda functions.
tar -zxvf cifar-10-binary.tar.gz

2.2 Configuring the Distributed Environment
There are two types of data parallelism on the CPU: single-server multi-node parallelism and multi-server multi-node parallelism (a training process can be regarded as a node). Before running the training script, set up the networking environment, including configuring environment variables and calling the initialization API in the training script.
Configure the environment variables as follows:
export MS_WORKER_NUM=8                # Number of worker nodes
export MS_SCHED_HOST=xxx.xxx.xxx..xxx        # Scheduler IP address
export MS_SCHED_PORT=6667             # Scheduler port
export MS_ROLE=MS_WORKER              # The role of this node. MS_SCHED represents the scheduler, MS_WORKER represents the worker.
MS_WORKER_NUM: number of worker nodes. In the multi-server scenario, the number of worker nodes is the sum of worker nodes on each server.
MS_SCHED_HOST: IP address of the scheduler node.
MS_SCHED_PORT: service port of the scheduler node. It is used to receive the IP addresses and service ports sent by worker nodes and deliver the collected information to each worker node.
MS_ROLE: node type, which can be worker (MS_WORKER) or scheduler (MS_SCHED). A scheduler node must be configured for networking no matter whether it is a single-server multi-node or multi-server multi-node scenario.
Call the initialization API in the training script as follows:
import mindspore as ms
from mindspore.communication import init

ms.set_context(mode=ms.GRAPH_MODE, device_target="CPU")
ms.set_auto_parallel_context(parallel_mode=ms.ParallelMode.DATA_PARALLEL, gradients_mean=True)
ms.set_ps_context(enable_ssl=False)
init()
ms.set_context(mode=context.GRAPH_MODE, device_target="CPU"): Sets the mode to graph mode (parallelism is not supported in PyNative mode on the CPU) and the device to CPU.
ms.set_auto_parallel_context(parallel_mode=ms.ParallelMode.DATA_PARALLEL, gradients_mean=True): specifies the data parallelism mode. gradients_mean=True indicates that the mean value is calculated after gradient reduction. Currently, only the sum operation is supported for gradient reduction on the CPU.
ms.set_ps_context: configures encrypted communication. You can set ms.set_ps_context(enable_ssl=True) to enable encrypted communication. The default value is False.
init: initializes a node. After the initialization is complete, the networking is successful.
- Loading the Dataset
A dataset is imported in data parallel mode during distributed training. The following uses the CIFAR-10 dataset as an example to describe how to import a dataset in data parallel mode. data_path indicates the dataset path (path of the cifar-10-batches-bin folder in this example).
The sample code is as follows:
import mindspore as ms
import mindspore.dataset as ds
import mindspore.dataset.vision as vision
import mindspore.dataset.transforms as transforms
from mindspore.communication import get_rank, get_group_size

def create_dataset(data_path, repeat_num=1, batch_size=32):
    """Create training dataset"""
    resize_height = 224
    resize_width = 224
    rescale = 1.0 / 255.0
    shift = 0.0

    # get rank_id and rank_size
    rank_size = get_group_size()
    rank_id = get_rank()
    data_set = ds.Cifar10Dataset(data_path, num_shards=rank_size, shard_id=rank_id)

    # define map operations
    random_crop_op = vision.RandomCrop((32, 32), (4, 4, 4, 4))
    random_horizontal_op = vision.RandomHorizontalFlip()
    resize_op = vision.Resize((resize_height, resize_width))
    rescale_op = vision.Rescale(rescale, shift)
    normalize_op = vision.Normalize((0.4465, 0.4822, 0.4914), (0.2010, 0.1994, 0.2023))
    changeswap_op = vision.HWC2CHW()
    type_cast_op = transforms.TypeCast(ms.int32)

    c_trans = [random_crop_op, random_horizontal_op]
    c_trans += [resize_op, rescale_op, normalize_op, changeswap_op]

    # apply map operations on images
    data_set = data_set.map(operations=type_cast_op, input_columns="label")
    data_set = data_set.map(operations=c_trans, input_columns="image")

    # apply shuffle operations
    data_set = data_set.shuffle(buffer_size=10)

    # apply batch operations
    data_set = data_set.batch(batch_size=batch_size, drop_remainder=True)

    # apply repeat operations
    data_set = data_set.repeat(repeat_num)

    return data_set
Unlike the single-server system, when Cifar10Dataset is constructed, the num_shards and shard_id parameters need to be passed, which correspond to the number of worker nodes and logical sequence number, respectively. You can obtain the parameter values using the following interfaces:
get_group_size: obtains the number of worker nodes in a cluster.
get_rank: obtains the logical sequence number of a worker node in the cluster.
When loading a dataset in parallel mode, you are advised to specify the same dataset file for each CPU to ensure calculation accuracy.
- Model Definition
In data parallel mode, the network definition is the same as that in a single-node system. For details, see the ResNet sample script. For the definitions of the optimizer, loss function, and training model, see the training model definition.
For details about the complete training script code, see the ResNet sample script. The training startup code is as follows:
import os
import mindspore as ms
import mindspore.nn as nn
from mindspore import train
from mindspore.communication import init
from resnet import resnet50

def train_resnet50_with_cifar10(epoch_size=10):
    """Start the training"""
    loss_cb = train.LossMonitor()
    data_path = os.getenv('DATA_PATH')
    dataset = create_dataset(data_path)
    batch_size = 32
    num_classes = 10
    net = resnet50(batch_size, num_classes)
    loss = SoftmaxCrossEntropyExpand(sparse=True)
    opt = nn.Momentum(filter(lambda x: x.requires_grad, net.get_parameters()), 0.01, 0.9)
    model = ms.Model(net, loss_fn=loss, optimizer=opt)
    model.train(epoch_size, dataset, callbacks=[loss_cb], dataset_sink_mode=True)


if __name__ == "__main__":
    ms.set_context(mode=ms.GRAPH_MODE, device_target="CPU")
    ms.set_auto_parallel_context(parallel_mode=ms.ParallelMode.DATA_PARALLEL, gradients_mean=True)
    ms.set_ps_context(enable_ssl=False)
    init()
    train_resnet50_with_cifar10()
In the script, the create_dataset and SoftmaxCrossEntropyExpand APIs are referenced from distributed_training_cpu, and the resnet50 API is referenced from the ResNet sample script.
5. Starting Training
The following uses a single-server 8-node system as an example to perform distributed training on the CPU platform. Go to the /home/ma-user/work/docs/docs/sample_code/distributed_training_cpu directory.

Run bash run.sh /dataset/cifar-10-batches-bin to start the training.
(PyTorch-1.8) [ma-user distributed_training_cpu]$bash run.sh cifar-10-batches-bin
==============================================================================================================
Please run the script with dataset path, such as:
bash run.sh DATA_PATH
For example: bash run.sh /path/dataset
It is better to use the absolute path.
==============================================================================================================
scheduler start success!
worker 0 start success with pid 8240
worker 1 start success with pid 8241
worker 2 start success with pid 8242
worker 3 start success with pid 8243
worker 4 start success with pid 8244
worker 5 start success with pid 8245
worker 6 start success with pid 8246
worker 7 start success with pid 8247
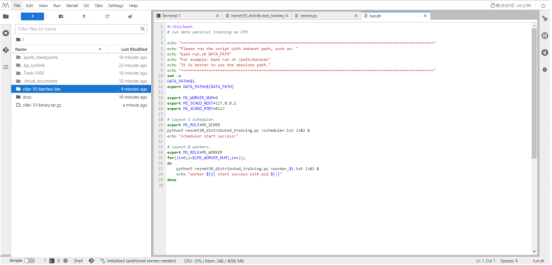
#!/bin/bash
# run data parallel training on CPU
echo "=============================================================================================================="
echo "Please run the script with dataset path, such as: "
echo "bash run.sh DATA_PATH"
echo "For example: bash run.sh /path/dataset"
echo "It is better to use the absolute path."
echo "=============================================================================================================="
set -e
DATA_PATH=$1
export DATA_PATH=${DATA_PATH}
export MS_WORKER_NUM=8
export MS_SCHED_HOST=xxx.xxx.xxx..xxx
export MS_SCHED_PORT=8117
# Launch 1 scheduler.
export MS_ROLE=MS_SCHED
python3 resnet50_distributed_training.py >scheduler.txt 2>&1 &
echo "scheduler start success!"
# Launch 8 workers.
export MS_ROLE=MS_WORKER
for((i=0;i<${MS_WORKER_NUM};i++));
do
python3 resnet50_distributed_training.py >worker_$i.txt 2>&1 &
echo "worker ${i} start success with pid ${!}"
done
resnet50_distributed_training.py is the defined training script. In the multi-server multi-node scenario, run the preceding script to start the training for corresponding worker nodes on each server. Given that there is only one scheduler node, you only need to start the training on the scheduler node for one server only (MS_SCHED_HOST).
MS_WORKER_NUM specifies the number of worker nodes that need to be started for training. If the number of started worker nodes is not enough, the networking fails.
Although the training script is executed on the scheduler node, the scheduler is mainly used for networking and does not participate in training.
After training for a period of time, open the worker_0 log. The training information is as follows:
(PyTorch-1.8) [ma-user distributed_training_cpu]$tail -f worker_0.txt

……
epoch: 1 step: 1, loss is 1.4686084
epoch: 1 step: 2, loss is 1.3278534
epoch: 1 step: 3, loss is 1.4246798
epoch: 1 step: 4, loss is 1.4920032
epoch: 1 step: 5, loss is 1.4324203
epoch: 1 step: 6, loss is 1.432581
epoch: 1 step: 7, loss is 1.319618