[MindSpore Made Easy - Robot Session-04] Setting Up an MLOps Environment
MindSpore Made Easy - Robot Session-04 Setting Up an MLOps Environment
This article describes how to set up a machine learning operations (MLOps) environment in iteration zero. The following figure outlines the overall MLOps pipeline design, including the continuous training pipeline and continuous integration and delivery (CI/CD) pipelines. For details about related code, see the MindSpore Usability SIG - Robot repository. 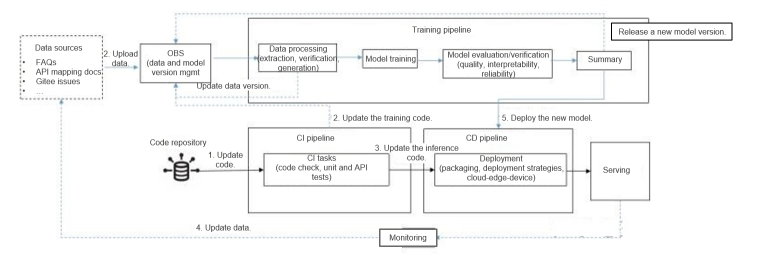 We build a CI/CD pipeline by using Jenkins and a continuous training pipeline using Argo, and then run Jenkins and Argo on Kubernetes to ensure service availability and scalability. The following illustrates how to use Minikube to set up the MLOps pipeline for a robot project and run the pipeline on a local PC. 1. Installing Docker on WSL (Ubuntu) For details about how to install Docker on WSL, see https://superuser.com/questions/1734044/how-to-install-docker-in-ubuntu-wsl. 2. Running Kubernetes Using Minikube Minikube is a utility for installing and configuring a Kubernetes cluster in a single-node system. It supports multiple platforms (macOS, Linux, and Windows). You can use Minikube to easily install and configure a Kubernetes cluster in a single Docker container or VM (running on Hyper-V or VMware). The procedure is as follows: Install Minikube on Ubuntu. curl -LO https://storage.googleapis.com/minikube/releases/latest/minikube-linux-amd64 sudo install minikube-linux-amd64 /usr/local/bin/minikube Run the minikube start command. Because Docker has been configured in the previous section, Minikube uses Docker as the VM by default during startup and starts the Kubernetes cluster in the container. Then run the docker ps command on Ubuntu and we can see a container is displayed in the output. CONTAINER ID IMAGE COMMAND CREATED STATUS PORTS NAMES 699a71fee349 kicbase/stable:v0.0.30 "/usr/local/bin/entr…" 2 weeks ago Up 2 hours xxx.xxx.xxx..xxx:49157->22/tcp, xxx.xxx.xxx..xxx:49156->2376/tcp, xxx.xxx.xxx..xxx:49155->5000/tcp, xxx.xxx.xxx..xxx:49154->8443/tcp, xxx.xxx.xxx..xxx:49153->32443/tcp minikube Run the docker exec -it 699a71fee349 command to access the container and then run the docker ps command to show the Kubernetes cluster services. CONTAINER ID IMAGE COMMAND CREATED STATUS PORTS NAMES af45f3caa0d9 99a3486be4f2 "kube-scheduler --au…" 2 hours ago Up 2 hours k8s_kube-scheduler_kube-scheduler-minikube_kube-system_be132fe5c6572cb34d93f5e05ce2a540_1 e648e7d30a7d Error 404 (Not Found)!!1 "/pause" 2 hours ago Up 2 hours k8s_POD_kube-apiserver-minikube_kube-system_cd6e47233d36a9715b0ab9632f871843_1 e26d9e92c4e3 k8s.gcr.io/pause:3.6 "/pause" 2 hours ago Up 2 hours k8s_POD_kube-scheduler-minikube_kube-system_be132fe5c6572cb34d93f5e05ce2a540_1 e658bf17922d Error 404 (Not Found)!!1 "/pause" 2 hours ago Up 2 hours k8s_POD_kube-controller-manager-minikube_kube-system_b965983ec05322d0973594a01d5e8245_1 1f85a9bae877 Error 404 (Not Found)!!1 "/pause" 2 hours ago Up 2 hours k8s_POD_etcd-minikube_kube-system_9d3d310935e5fabe942511eec3e2cd0c_1 .... Exit the container. After kubectl is installed, we can use kubectl to manage the cluster on Ubuntu. curl -LO "https://dl.k8s.io/$(curl -L -s https://dl.k8s.io/release/stable.txt)/bin/linux/amd64/kubectl.sha256" sudo install -o root -g root -m 0755 kubectl /usr/local/bin/kubectl Run kubectl get nodes to query the nodes managed by Kubernetes. ~$ kubectl get nodes NAME STATUS ROLES AGE VERSION minikube Ready control-plane,master 19d v1.23.3 You can also run minikube dashboard to start the Kubernetes dashboard and access http://xxx.xxx.xxx..xxx:44185/api-server/v1/namespaces/kubernetes-dashboard/services/http:kubernetes-dashboard:/proxy/ using a browser on Windows. Minikube enables us to have a local Kubernetes cluster with the same functions as in the production environment. However, this also brings network complexity. As shown in the following figure, Ubuntu runs on a Hyper-V VM, services deployed in Kubernetes run in the container of the Docker container on Ubuntu (Docker in Docker). Therefore, if we want to access services running in Kubernetes using a web browser on Windows, we need to run the kubectl port-forward command to map ports between the Ubuntu VM and the Minikube container, and then use the minikube tunnel command to map ports between the VM and Windows.
 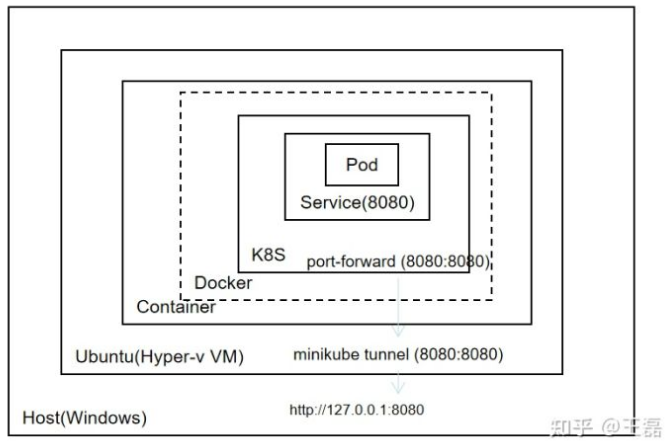 3. Building CI/CD Pipelines Using Kubernetes and Jenkins Jenkins is a classic CI tool with a powerful plugin ecosystem. The purposes of building the CI/CD pipeline by using Jenkins and Kubernetes are to implement: Elastic deployment of Jenkins based on Kubernetes Running CI tasks on Kubernetes using a Jenkins plugin Jenkins Pipeline as Code for pipeline configuration and management (CI/CD tasks) 3.1 Implementing Elastic Deployment of Jenkins Based on Kubernetes Refer to the configuration file for deploying Jenkins on Kubernetes from the MindSpore Usability SIG-Robot repository. Here we set type to LoadBalancer. --- apiVersion: v1 kind: Service metadata: name: jenkins spec: type: LoadBalancer selector: name: jenkins ports: - name: http port: 8080 targetPort: 8080 protocol: TCP Run the kubectl create -n jenkins command to create a namespace for Jenkins, run kubectl apply -f jenkins.yaml -n jenkins to deploy Jenkins, and run kubectl apply -f service-account.yaml -n jenkins to authorize API invoking. In the configuration file, the exposed port is 8080. Therefore, we run kubectl port-forward svc jenkins/jenkins 8080:8080 -n jenkins to map the ports, and then run minikube tunnel command so that we can open the Jenkins page by inputting xxx.xxx.xxx..xxx:8080 in the address box of the browser. The initial password can be obtained from the pod startup log. 3.2 Running CI tasks on Kubernetes Using a Jenkins Plugin After Jenkins is deployed on Kubernetes, we need to install the Kubernetes plugin for Jenkins and set the node type to Kubernetes cluster. Install the Kubernetes plugin on the plugin management page, and then configure the cluster on the node management page. Configure the Kubernetes cluster information. In a Kubernetes cluster, services can access each other using host names. Therefore, we only need to set Kubernetes address to https://kubernetes.defaults, Kubernetes namespace to jenkins, and Jenkins address to http://jenkins.jenkins:8080. Configure a pod template, that is, the base image and related information configuration of the pod for running tasks. Save the configurations. 3.3 Jenkins Pipeline as Code for Pipeline Configuration and Management Pipeline as Code describes a set of features that allow Jenkins users to define pipelined job processes with code, stored and versioned in a source repository. These features allow Jenkins to discover, manage, and run jobs for multiple source repositories and branches — eliminating the need for manual job creation and management. The last step is to set up the CI/CD pipeline based on Pipeline as Code. According to the design, the CI/CD pipeline should include the following tasks: CI Code check, including check of data processing code, model code, inference code, and script code specifications Unit tests for data processing logic, model code logic, and inference code logic Function tests of inference APIs Triggering of the Argo training pipeline once the training code is modified Deployment To use Pipeline as Code, configure as follows: pipeline { agent { kubernetes { containerTemplate { name 'python' image 'bitnami/java:1.8' command 'sleep' args 'infinity' } defaultContainer 'python' } } stages { stage('Code Check ') { steps("Code Check") { echo 'checking python code.' } } stage('Unit Testing') { steps("Unit Testing") { echo "running unit tests" } } stage('API Testing') { steps { echo 'running inference API Testing' } } stage('Training Trigger') { when { changeset "src/train/*.py" } steps("trigger training") { echo 'trigger new round of training' } } } } The script for deploying the pipeline is as follows: pipeline { agent any stages { stage('Packaging') { steps("Packaging") { echo 'packaging with model and inference code' } } stage('Continuous Deployment') { steps("deploying") { echo 'deploy new version of model' } } } } The steps are left blank in the configuration file for debugging. After a pipeline is created on Jenkins based on the preceding configuration file, the test result is as follows:
4. Continuously Training the Pipeline Using Kubernetes and Argo Argo is an open source workflow management tool based on Kubernetes. It also supports machine learning workflows. The MindSpore DX SIG has used this tool in previous community robot projects, so here we reuse the tool and configurations. The following describes how to install and configure the Argo workflow. 4.1 Installing Argo on Kubernetes Run the kubectl create -n argo command to create a namespace for Argo. Then, run the kubect apply -f install.yml -n argo command based on the configuration file to complete the installation. Run the kubect apply -f manifests/create_serviceaccount.yaml -n argo command to configure permissions. Similar to the previous Jenkins configuration, the Argo server type must be set to LoadBalancer. apiVersion: v1 kind: Service metadata: name: argo-server spec: ports: - name: web port: 2746 targetPort: 2746 type: LoadBalancer sessionAffinity: None externalTrafficPolicy: Cluster selector: app: argo-server Run the kubectl get svc -n argo command. The following information is displayed: ~$ kubectl get svc -n argo NAME TYPE CLUSTER-IP EXTERNAL-IP PORT(S) AGE argo-server LoadBalancer xxx.xxx.xxx..xxx.232 xxx.xxx.xxx..xxx 2746:30001/TCP 19d workflow-controller-metrics ClusterIP xxx.xxx.xxx..xxx 9090/TCP 19d If you want to access the Argo WebUI using a browser on Windows, expose the argo-server port by running kubectl port-forward svc/argo-server 2746:2746 -n argo to complete port mapping. Then open a browser, access https://xxx.xxx.xxx..xxx:2746, and run the following script to obtain the password for login to the Argo WebUI. #!/bin/bash SECRET=$(kubectl get sa argo-server -n argo -o=jsonpath='{.secrets[0].name}') ARGO_TOKEN="Bearer $(kubectl get secret $SECRET -n argo -o=jsonpath='{.data.token}' | base64 --decode)" echo $ARGO_TOKEN 4.2 Configuring a Machine Learning Pipeline Using an Argo Workflow We expect a trained workflow to do the following: Data processing Training Evaluation Quality evaluation: Evaluates a model based on the test dataset. The predicted performance must be higher than the baseline value. Interpretability evaluation Reliability evaluation Summary Based on the workflow design and Argo workflow syntax, we can obtain the following basic configurations: apiVersion: Page Not Found kind: Workflow metadata: generateName: robot-train-eval- spec: serviceAccountName: robot-sa entrypoint: robot-controller onExit: summary templates: - name: robot-controller steps: - - name: data-process template: process - - name: robot-train template: train - - name: robot-eval template: eval - name: robot-interpretability template: interpretability - name: robot-reliability template: reliability - - name: summary template: summary Then, expand the configuration required by each task, for example, the configuration code for training. - name: train container: image: ubuntu imagePullPolicy: Always env: - name: IS_TRAIN value: "True" - name: NUM_STEPS value: "10" command: ['echo'] args: ["training"] ... Sum up all tasks to complete the workflow. Next, let's try to run the training pipeline using Argo. 4.3 Running the Machine Learning Pipeline To use the Argo CLI client to submit workflow tasks, install the client first. #!/bin/bash # Download the binary curl -sLO https://github.com/argoproj/argo-workflows/releases/download/v3.3.5/argo-linux-amd64.gz # Unzip gunzip argo-linux-amd64.gz # Make binary executable chmod +x argo-linux-amd64 # Move binary to path mv ./argo-linux-amd64 /usr/local/bin/argo Run the argo submit -n robot --watch robot-train-eval.yaml command on the Argo CLI. The execution result is as follows, which is the same as we expected in the configured workflow. 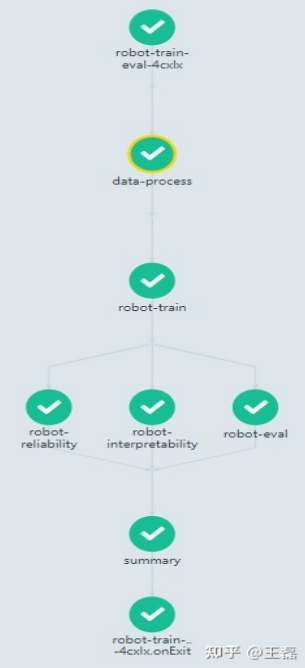
Summary This article illustrates how to set up an MLOps environment on a local PC. Tools such as Minikube and Argo are used to perform development and verification locally without relying on complex infrastructure or extra overhead. We did not include actual implementations in the configuration file and script. This is to streamline the process so that we could add debugged code step by step and complete the verification from the end-to-end perspective.