Charmed Kubeflow Now Integrates with MindSpore
Charmed Kubeflow Now Integrates with MindSpore
On 8 November 2022, at Open Source Experience Paris, Canonical announced that Charmed Kubeflow, Canonical’s enterprise-ready Kubeflow distribution, now integrates with MindSpore, an open source deep learning framework.
What is Charmed Kubeflow?
Charmed Kubeflow is a production-grade, end-to-end MLOps platform that translates steps in the data science workflow into Kubernetes jobs. It is one of the official distributions of the Kubeflow upstream project. Using it, data scientists and machine learning engineers benefit from having ML deployments that are simple, portable and scalable. It has capabilities that cover a wide range, from experimentation using Notebooks, to training using the Kubeflow Pipelines, or tuning using Katib.
Why Integrate Kubeflow and MindSpore?
Part of a robust set of integrations, the new, native integration with MindSpore provides access to unified APIs and end-to-end AI capabilities for model development, execution and deployment. MindSpore offers AI-native execution modes, fully using the computing power provided by Huawei’s hardware.
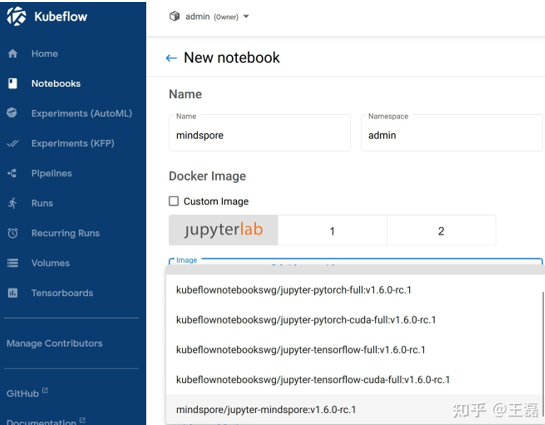
MindSpore is optimized for Huawei hardware, such as Ascend/GPU/CPU, and can be quickly deployed in cloud, edge, and mobile scenarios, allowing engineers to develop solutions for a wide spectrum of use cases. MindSpore runs on the Jupyter Notebook, a web-based interactive computing platform. When creating the Notebook, engineers can choose the MindSpore image from the default Jupyter Lab image list, assign certain CPU resources and spin up a notebook instance that can run MindSpore and its Vision suite code to do machine learning experiments.
By providing a native integration with MindSpore and collaborating with Huawei on this open-source project, Canonical is providing the MLOPs ecosystem with an increasingly rich toolset. Charmed Kubeflow integrates with multiple AI/ML tools, such as MLFlow, which provides a central model registry, and Spark, which facilitates data streaming. The MindSpore integration provides access to the solution’s various features, such as unified programming and operators, automatic model partitioning, and dynamic and static computation graphs.
How to Work with MindSpore on Kubeflow?
1. Access and Configure Charmed Kubeflow
Bear in mind that you need to run Ubuntu 20.04 or later with, a minimum of 32 GB of free memory and 50 GB of disk space. During the deployment process, you will
- Install MicroK8s
- Install Juju
- Deploy Charmd Kubeflow
Once Charmed Kubeflow is deployed and all Kubeflow components have the active status, please follow the instructions below.
juju refresh jupyter-ui --channel=latest/edge
This step updates jupyter-ui to the latest version, so it includes MindSpore’s Notebook image.
After Kubeflow is installed, you need to do a simple configuration to access it. First configure the access address:
Juju config dex-auth public-url=http://xxx.xxx.xxx..xxx.nip.io
juju config oidc-gatekeeper public url=http://xxx.xxx.xxx..xxx.nip.io
Then configure the username and password for access:
juju config dex-auth static-username=admin

juju config dex-auth static-password=****
Next, enter http://xxx.xxx.xxx..xxx.nip.io in the browser, and the user password you just set. Then you can see the complete Dashboard of Kubeflow.
2. Create a MicroK8s cluster with two nodes
NOTE: Charmed Kubeflow with Mindspore requires a Kubernetes cluster with one x86 node for deploying Charmed Kubeflow and one ARM64 node (preferably with the Ascend AI processor) for scheduling workers. This step is required as Charmed Kubeflow can only be deployed in x86 architectures. Please note the following instructions are Microk8s specific.
The x86 node will be now referred as the primary node (this is where your Charmed Kubeflow deployment will live and will host the k8s control plane), and the ARM64 node will be referred as the secondary node (this is where the workers will be scheduled).
Install microk8s 1.22 in both PRIMARY and SECONDARY nodes:
sudo snap install microk8s --channel 1.22/stable –classic
Add the secondary node to the Kubernetes cluster, and run the following in the PRIMARY node:
microk8s add-node
This will return some joining instructions which should be executed on the MicroK8s instance that you wish to join to the cluster (NOT THE NODE YOU RAN add-node FROM). Please follow these instructions and verify you can list the recently added node. For more information on this step, please refer to Adding a node documentation.
Verify that your recently added node is listed.
microk8s kubectl get no
Label your secondary node, and run the following in the PRIMARY node:
microk8s kubectl label nodes kubernetes.io/arch=arm64
3. Run MindSpore-enabled Notebooks
In order to access MindSpore within Charmed Kubeflow, you will need to use the natively enabled Notebooks. On the Notebook tab, from the Charmed Kubeflow dashboard, select Create Notebook, enter the notebook name MindSpore, select jupyterlab for the image, use mindspore/jupyter-mindspore from the list, allocate appropriate CPU and content resources, and click Create.
In the Notebook interface, you can see the prompt that the creation is completed soon.

Click Connect, and we can open the notebook in another browser tab page. Here we can use the existing notebook on MindSpore’s official website to upload the handwritten digit recognition notebook through the notebook page.
Click Execute, and you can see that the notebook is running directly without additional installation of MindSpore and Vision suites.
Get started with your first project
Once you have the MindSpore image natively enabled in your Notebook from Charmed Kubeflow, you can go ahead and start your AI/ML projects. Whereas MindSpore is designed to support a wide range of use cases, computer vision might be an interesting example.