Deploying a DeepSeek Model: Janus-Pro on OrangePi AIpro Development Board
Deploying a DeepSeek Model: Janus-Pro on OrangePi AIpro Development Board
Introduction
In the 2025 Chinese New Year, the AI field witnessed another wave of innovation with the emergence of DeepSeek's Janus-Pro model, featuring an innovative dual-path architecture and powerful multimodal interaction capabilities.
To help developers get started quickly, we have deployed the DeepSeek-Janus-Pro model on the 24-GB OrangePi AIpro (20T) development board using the MindSpore AI framework and MindSpore NLP suite. We hope that through our efforts, we can contribute to the development of the AI community and encourage more people to participate in the AI revolution. The following provides a detailed tutorial for deploying DeepSeek-Janus-Pro.
Open source links:
https://gitee.com/mindspore-lab/mindnlp.git
https://github.com/mindspore-lab/mindnlp.git
Preparation
Hardware and Software Requirements
Hardware:
One OrangePi AIpro (20T) development board, mouse, keyboard, display, network cable, and power cable
Software Environment

Step 1: Burning an Image
1. Download an image.
Note: Different Orange Pi models require different images. Download the image specifically for the OrangePi AIpro (20T).
First, download the OrangePi AIpro (20T) development board image from the official website: http://www.orangepi.cn/html/hardWare/computerAndMicrocontrollers/service-and-support/Orange-Pi-AIpro%2820T%29.html.
Upon entering the page, you will see two image environments: Ubuntu and openEuler. This tutorial uses the Ubuntu image as an example.
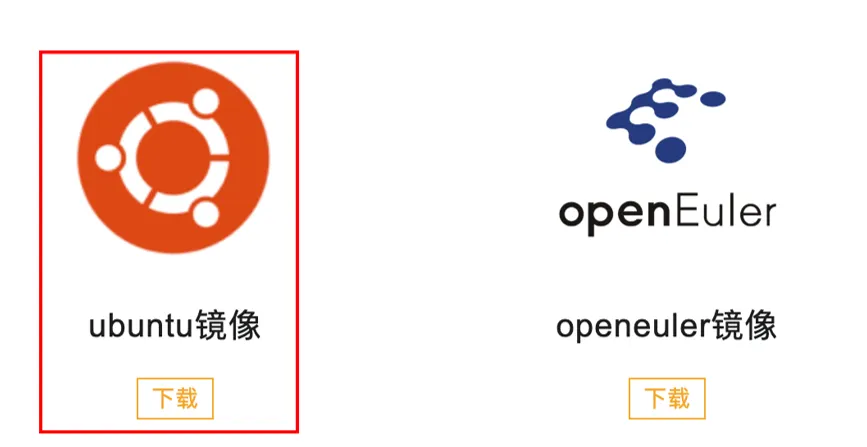
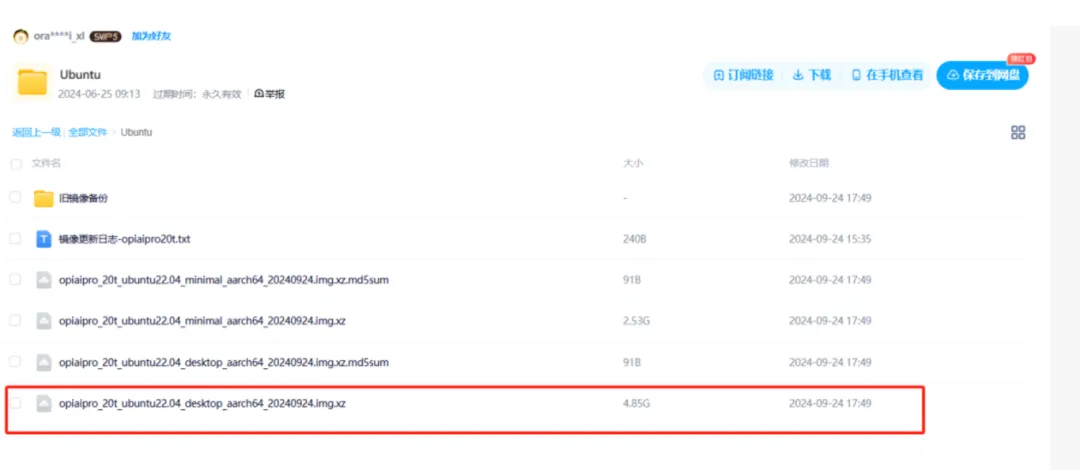
Click Download and proceed to Baidu Netdisk. Select Ubuntu and opiaipro_20t_ubuntu22.04_desktop_aarch64_20240924.img.xz to download.
2. Burn the image.
Prepare an SD card with at least 64G of storage. Insert the SD card into a card reader and run balenaEtcher 1.18 as an administrator to burn the image.
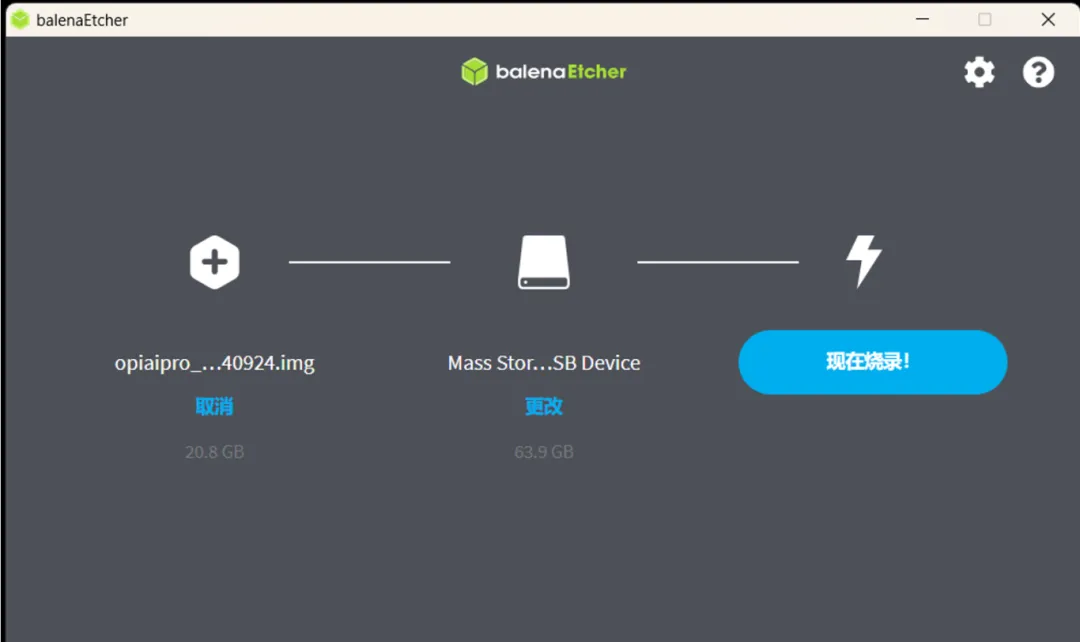
After selecting the image file and SD card, you can start burning. After the burning is complete, a message is displayed, indicating that the burning is successful.
Step 2: Development Board Startup and Connection
1. Connect to the development board.
Insert the SD card with the successfully burned image into the Orange Pi card slot and power on the development board. Ensure that the development board is connected to a display, keyboard, and mouse beforehand. For connection details, refer to the official user manual at http://www.orangepi.cn/html/hardWare/computerAndMicrocontrollers/service-and-support/Orange-Pi-AIpro(20T).html.
After the development board starts up, it supports multiple connection methods, such as serial port connection and network cable connection. For details, see sections 2.9, 3.5, and 3.6 in the user manual. Select one of the connection methods to connect to the development board.
2. Set the swap memory.
After logging in to the development board, refer to section 3.18 to set the swap memory to 24 GB.
Environment Configuration
01
CANN Upgrade
1. Download the CANN package.
The image comes pre-installed with CANN 7.0, which needs to be upgraded.
In the development board system, visit the official website (https://www.hiascend.com/developer/download/community/result?module=cann&cann=8.0.RC3.alpha002) and filter the information as shown in the following figure.
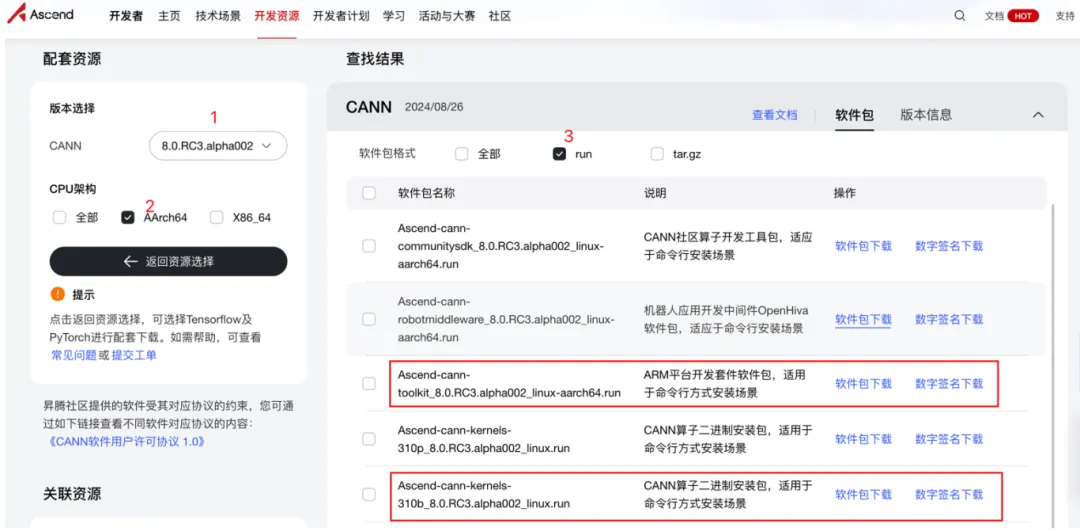
Download the following files:
Ascend-cann-toolkit_8.0.RC3.alpha002_linux-aarch64.run and Ascend-cann-kernels-310b_8.0.RC3.alpha002_linux.run
2. Install the CANN package.
After the download is complete, go to the download directory. If you use a browser to download the file, the file is stored in the ~/Downloads directory by default. In the terminal, run the following commands (comments are provided after the # symbol).


sudo su # You will be prompted for a password; the default is Mind@123. Characters will not be displayed during input, and you will switch to the root user after inputting the password.
At this point, you have switched to the root user, and the terminal prompt changes to root.

Run the following command to grant execute permission on the two downloaded installation packages:
chmod +x Ascend*
Run the following command to install the toolkit package (approximately 10 minutes required):
./Ascend-cann-toolkit_8.0.RC3.alpha002_linux-aarch64.run --install
Enter Y as prompted.
Run the following command to install the kernels package (approximately 10 minutes required):
./Ascend-cann-kernels-310b_8.0.RC3.alpha002_linux.run --install
Enter Y as prompted.
After kernels is installed, run the following command:
ls /usr/local/Ascend/ascend-toolkit/latest/opp/built-in/op_impl/ai_core/tbe/kernel/
The following information is displayed.

If the output is incorrect, reinstall CANN.
After the installation is complete, run the following command in the terminal:
exit
Exit the root user. The terminal changes back to the following.

Run the following commands to set environment variables (the current user account must be HwHiAiUser):
echo "source /usr/local/Ascend/ascend-toolkit/set_env.sh" >> ~/.bashrc

source ~/.bashrc
02
MindSpore Installation
1. Install dependency packages.
Before installing MindSpore version 2.4.10, we need to install the MindSpore dependency packages. In the terminal, run the following commands:
pip config set global.index-url https://pypi.tuna.tsinghua.edu.cn/simple
pip install sympy
pip install /usr/local/Ascend/ascend-toolkit/latest/lib64/te-*-py3-none-any.whl
pip install /usr/local/Ascend/ascend-toolkit/latest/lib64/hccl-*-py3-none-any.whl
2. Install MindSpore.
After the dependency installation is complete, install MindSpore 2.4.10. Visit the MindSpore official website at https://www.mindspore.cn/en.
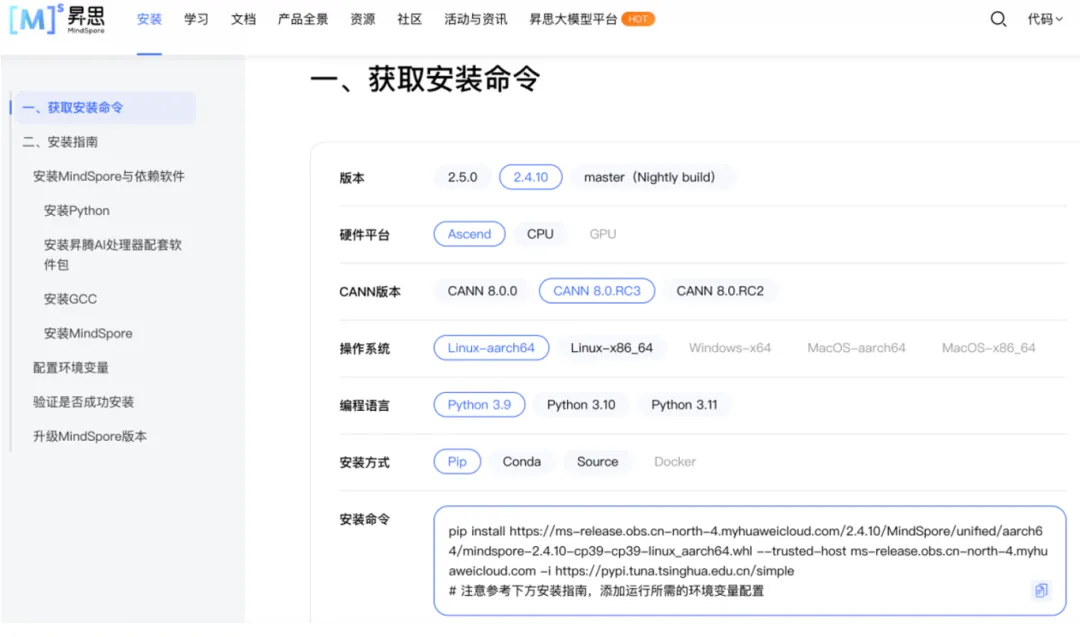
Select the corresponding MindSpore, Python, and CANN versions (this installation configuration is consistent with the screenshot provided). Then, copy the installation command and execute it in the terminal.
3. Check whether the installation is successful.
After MindSpore is installed, run the following command to verify the installation:
python -c "import mindspore;mindspore.set_context(device_target='Ascend');mindspore.run_check()"
The output should be as follows.

03 MindSpore NLP Installation
Note that all commands below must be executed under the HwHiAiUser account.
First, download the MindSpore NLP code, which has been adapted for Janus. Then, execute the following commands in the terminal to install MindSpore NLP from the source code:
cd ~
git clone https://gitee.com/mindspore-lab/mindnlp.git
cd mindnlp
git checkout janus
pip install -e .
Running Cases
Note that all commands below must be executed under the HwHiAiUser account.
01 Downloading the Janus Model Weight
Execute the following commands in the terminal:
pip install modelscope


modelscope download --model deepseek-ai/Janus-Pro-1B  --local_dir  /home/HwHiAiUser/Janus-Pro-1B
The download time depends on your internet speed.
After the download is complete, the model weight will be saved in /home/HwHiAiUser/Janus-Pro-1B. To save it in another location, modify the local_dir parameter and update the model_path values in mindnlp/llm/inference/janus_pro/understanding.py and mindnlp/llm/inference/janus_pro/generation.py to the desired directory address.

02 Model Execution
Note: Due to high memory usage, ensure swap memory is set up (refer to section 3.18 of the user manual).
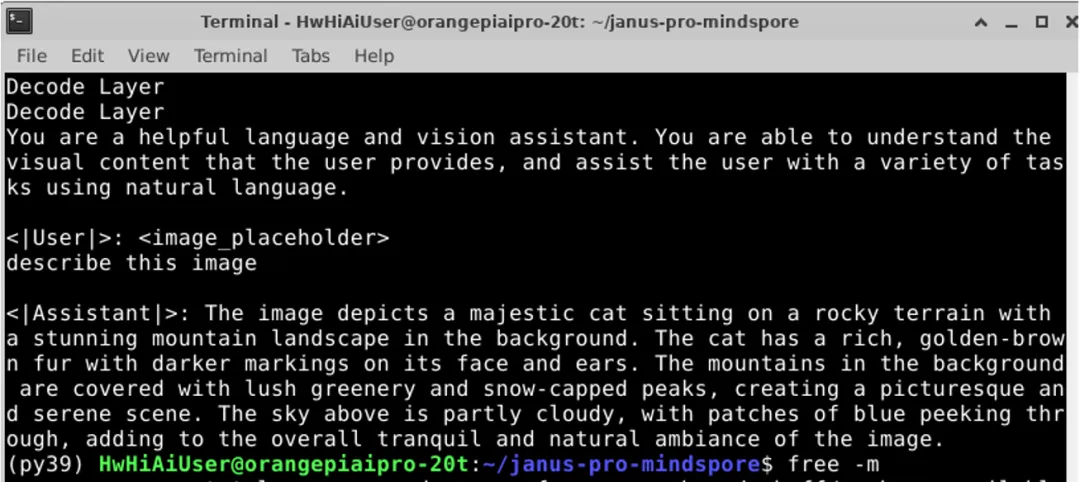
1. Run an image understanding task.
Run the image understanding task and enter the following information in the terminal:
pip install attrdict
cd ~/mindnlp/llm/inference/janus_pro
python understanding.py
The input image is as follows.

The execution result is as follows.
2. Run an image generation task.
Run the image generation task and enter the following information in the terminal:
python generation.py
The input prompt is: A stunning princess from kabul in red, white traditional clothing, blue eyes, brown hair.
The following image is generated in the ~/mindnlp/llm/inference/janus_pro/generated_samples directory: