对OCR模型CNN-CTC的鲁棒性评测
![]()
概述
本教程主要演示利用自然扰动serving服务,对OCR模型CNN-CTC做一个简单的鲁棒性评测。先基于serving生成多种自然扰动样本数据集,然后根据CNN-CTC模型在自然扰动样本数据集上的表现来评估模型的鲁棒性。
环境要求
硬件
Ascend或GPU处理器搭建硬件环境。
依赖
MindSpore-Serving >= 1.6.0
MindArmour
脚本说明
代码结构
|-- natural_robustness
    |-- serving                         # 提供自然扰动样本生成的serving服务
    |-- ocr_evaluate
        |-- cnn_ctc                     # cnn_ctc模型目录:模型的训练、推理、前后处理
        |-- data                        # 存储实验分析数据
        |-- default_config.yaml         # 参数配置
        |-- generate_adv_samples.py     # 用于生成自然扰动样本
        |-- eval_and_save.py            # cnn_ctc在扰动样本上推理,并保存推理结果
        |-- analyse.py                  # 分析cnn_ctc模型的鲁棒性
脚本参数
在default_config.yaml中可以同时配置训练参数、推理参数、鲁棒性评测参数。这里我们重点关注在评测过程中使用到的参数,以及需要用户配置的参数,其余参数说明参考CNN-CTC教程。
--TEST_DATASET_PATH:测试数据集路。--CHECKPOINT_PATH:checkpoint路径。--ADV_TEST_DATASET_PATH:扰动样本数据集路径。--IS_ADV:是否使用扰动样本进行测试。
模型与数据
被评测的模型为基于MindSpore实现的OCR模型CNN-CTC,该模型主要针对场景文字识别(Scene Text Recognition)任务,用CNN模型提取特征,用CTC(Connectionist temporal classification)预测输出序列。
论文: J. Baek, G. Kim, J. Lee, S. Park, D. Han, S. Yun, S. J. Oh, and H. Lee, “What is wrong with scene text recognition model comparisons? dataset and model analysis,” ArXiv, vol. abs/1904.01906, 2019.
数据处理与模型训练参考CNN-CTC教程。评测任务需基于该教程获得预处理后的数据集和checkpoint模型文件。
预处理后的数据集为.lmdb格式,以键值对方式存储:
label-%09d:图片的真实标签
image-%09d:原始图片数据
num-samples:lmdb数据集中的样本数量
其中,%09d为:长度为9的数字串。形如:label-000000001。
基于自然扰动serving生成评测数据集
启动自然扰动serving服务。具体说明参考:自然扰动样本生成serving服务
cd serving/server/
python serving_server.py
基于serving服务,生成测评数据集。
在default_config.yaml中配置原来测试样本数据路径
TEST_DATASET_PATH和生成扰动样本数据集路径ADV_TEST_DATASET_PATH。例如:TEST_DATASET_PATH: "/opt/dataset/CNNCTC_data/MJ-ST-IIIT/IIIT5k_3000" ADV_TEST_DATASET_PATH: "/home/mindarmour/examples/natural_robustness/ocr_evaluate/data"
核心代码说明:
配置扰动方法,目前可选的扰动方法及参数配置参考image transform methods。下面是一个配置例子。
PerturbConfig = [
    {"method": "Contrast", "params": {"alpha": 1.5, "beta": 0}},
    {"method": "GaussianBlur", "params": {"ksize": 5}},
    {"method": "SaltAndPepperNoise", "params": {"factor": 0.05}},
    {"method": "Translate", "params": {"x_bias": 0.1, "y_bias": -0.1}},
    {"method": "Scale", "params": {"factor_x": 0.8, "factor_y": 0.8}},
    {"method": "Shear", "params": {"factor": 1.5, "direction": "horizontal"}},
    {"method": "Rotate", "params": {"angle": 30}},
    {"method": "MotionBlur", "params": {"degree": 5, "angle": 45}},
    {"method": "GradientBlur", "params": {"point": [50, 100], "kernel_num": 3, "center": True}},
    {"method": "GradientLuminance", "params": {"color_start": [255, 255, 255], "color_end": [0, 0, 0], "start_point": [100, 150], "scope": 0.3, "bright_rate": 0.3, "pattern": "light", "mode": "circle"}},
    {"method": "GradientLuminance", "params": {"color_start": [255, 255, 255], "color_end": [0, 0, 0], "start_point": [150, 200], "scope": 0.3, "pattern": "light", "mode": "horizontal"}},
    {"method": "GradientLuminance", "params": {"color_start": [255, 255, 255], "color_end": [0, 0, 0], "start_point": [150, 200], "scope": 0.3, "pattern": "light", "mode": "vertical"}},
    {"method": "Curve", "params": {"curves": 0.5, "depth": 3, "mode": "vertical"}},
    {"method": "Perspective", "params": {"ori_pos": [[0, 0], [0, 800], [800, 0], [800, 800]], "dst_pos": [[10, 0], [0, 800], [790, 0], [800, 800]]}},
]
准备需要扰动的数据。
instances = []
methods_number = 1
outputs_number = 2
perturb_config = json.dumps(perturb_config)
env = lmdb.open(lmdb_paths, max_readers=32, readonly=True, lock=False, readahead=False, meminit=False)
if not env:
    print('cannot create lmdb from %s' % (lmdb_paths))
    sys.exit(0)
with env.begin(write=False) as txn:
    n_samples = int(txn.get('num-samples'.encode()))
    # Filtering
    filtered_labels = []
    filtered_index_list = []
    for index in range(n_samples):
        index += 1  # lmdb starts with 1
        label_key = 'label-%09d'.encode() % index
        label = txn.get(label_key).decode('utf-8')
        if len(label) > max_len: continue
        illegal_sample = False
        for char_item in label.lower():
            if char_item not in config.CHARACTER:
                illegal_sample = True
                break
        if illegal_sample: continue
        filtered_labels.append(label)
        filtered_index_list.append(index)
        img_key = 'image-%09d'.encode() % index
        imgbuf = txn.get(img_key)
        instances.append({"img": imgbuf, 'perturb_config': perturb_config, "methods_number": methods_number,
                          "outputs_number": outputs_number})

print(f'num of samples in IIIT daaset: {len(filtered_index_list)}')
请求自然扰动serving服务,并保存serving返回的数据。
ip = '0.0.0.0:8888'
client = Client(ip, "perturbation", "natural_perturbation")
start_time = time.time()
result = client.infer(instances)
end_time = time.time()
print('generated natural perturbs images cost: ', end_time - start_time)
env_save = lmdb.open(lmdb_save_path, map_size=1099511627776)

txn = env.begin(write=False)
with env_save.begin(write=True) as txn_save:
    new_index = 1
    for i, index in enumerate(filtered_index_list):
        try:
            file_names = result[i]['file_names'].split(';')
        except:
            print('index: ', index)
            print(result[i])
        length = result[i]['file_length'].tolist()
        before = 0
        label = filtered_labels[i]
        label = label.encode()
        img_key = 'image-%09d'.encode() % index
        ori_img = txn.get(img_key)
        names_dict = result[i]['names_dict']
        names_dict = json.loads(names_dict)
        for name, leng in zip(file_names, length):
            label_key = 'label-%09d'.encode() % new_index
            txn_save.put(label_key, label)
            img_key = 'image-%09d'.encode() % new_index
            adv_img = result[i]['results']
            adv_img = adv_img[before:before + leng]
            adv_img_key = 'adv_image-%09d'.encode() % new_index
            txn_save.put(img_key, ori_img)
            txn_save.put(adv_img_key, adv_img)

            adv_info_key = 'adv_info-%09d'.encode() % new_index
            adv_info = json.dumps(names_dict[name]).encode()
            txn_save.put(adv_info_key, adv_info)
            before = before + leng
            new_index += 1
    xn_save.put("num-samples".encode(),str(new_index - 1).encode())
env.close()
执行自然扰动样本生成脚本:
python generate_adv_samples.py生成的自然扰动数据为.lmdb格式,包含下列键值对数据项:
label-%09d:图片的真实标签
image-%09d:原始图片数据
adv_image-%09d:生成的扰动图片数据
adv_info-%09d:扰动信息,包含扰动方法和参数
num-samples:lmdb数据集中的样本数量
CNN-CTC模型在生成扰动数据集上推理
在default_config.yaml中将测试数据集路径
TEST_DATASET_PATH设置成和生成扰动样本数据集路径ADV_TEST_DATASET_PATH一样的。例如:TEST_DATASET_PATH: "/home/mindarmour/examples/natural_robustness/ocr_evaluate/data" ADV_TEST_DATASET_PATH: "/home/mindarmour/examples/natural_robustness/ocr_evaluate/data"
核心脚本说明
加载模型和数据集
ds = test_dataset_creator(is_adv=config.IS_ADV)
net = CNNCTC(config.NUM_CLASS, config.HIDDEN_SIZE, config.FINAL_FEATURE_WIDTH)

ckpt_path = config.CHECKPOINT_PATH
param_dict = load_checkpoint(ckpt_path)
load_param_into_net(net, param_dict)
print('parameters loaded! from: ', ckpt_path)
推理并保存模型对于原始样本和扰动样本的推理结果。
env_save = lmdb.open(lmdb_save_path, map_size=1099511627776)
with env_save.begin(write=True) as txn_save:
    for data in ds.create_tuple_iterator():
        img, _, text, _, length = data

        img_tensor = Tensor(img, mstype.float32)
        model_predict = net(img_tensor)
        model_predict = np.squeeze(model_predict.asnumpy())

        preds_size = np.array([model_predict.shape[1]] * config.TEST_BATCH_SIZE)
        preds_index = np.argmax(model_predict, 2)
        preds_index = np.reshape(preds_index, [-1])
        preds_str = converter.decode(preds_index, preds_size)
        label_str = converter.reverse_encode(text.asnumpy(), length.asnumpy())

        print("Prediction samples: \n", preds_str[:5])
        print("Ground truth: \n", label_str[:5])
        for pred, label in zip(preds_str, label_str):
            if pred == label:
                correct_count += 1
            count += 1
            if config.IS_ADV:
                pred_key = 'adv_pred-%09d'.encode() % count
            else:
                pred_key = 'pred-%09d'.encode() % count

            txn_save.put(pred_key, pred.encode())
accuracy = correct_count / count
执行eval_and_save.py脚本:
python eval_and_save.pyCNN-CTC模型在生成的自然扰动数据集上进行推理,并在
ADV_TEST_DATASET_PATH中保存模型对于每个样本的推理结果。数据集中新增键值对数据项:
pred-%09d:模型对原始图片数据的预测结果
adv_pred-%09d:模型对扰动图片数据的预测结果
模型对于真实样本的预测结果:
Prediction samples:
    ['private', 'private', 'parking', 'parking', 'salutes']
Ground truth:
    ['private', 'private', 'parking', 'parking', 'salutes']
Prediction samples:
    ['venus', 'venus', 'its', 'its', 'the']
Ground truth:
    ['venus', 'venus', 'its', 'its', 'the']
Prediction samples:
    ['summer', 'summer', 'joeys', 'joeys', 'think']
Ground truth:
    ['summer', 'summer', 'joes', 'joes', 'think']
...
模型对于自然扰动样本的预测结果:
Prediction samples:
    ['private', 'private', 'parking', 'parking', 'salutes']
Ground truth:
    ['private', 'private', 'parking', 'parking', 'salutes']
Prediction samples:
    ['dams', 'vares', 'its', 'its', 'the']
Ground truth:
    ['venus', 'venus', 'its', 'its', 'the']
Prediction samples:
    ['sune', 'summer', '', 'joeys', 'think']
Ground truth:
    ['summer', 'summer', 'joes', 'joes', 'think']
...
模型在原始测试数据集和自然扰动数据集上的准确率:
num of samples in IIIT dataset: 5952
Accuracy of benign sample:  0.8546195652173914
Accuracy of perturbed sample:  0.6126019021739131
鲁棒性分析
根据CNN-CTC模型在扰动数据集上的表现进行统计分析。运行脚本analyse.py。
python analyse.py
分析结果:
Number of samples in analyse dataset:  5952
Accuracy of original dataset:  0.46127717391304346
Accuracy of adversarial dataset:  0.6126019021739131
Number of samples correctly predicted in original dataset but wrong in adversarial dataset:  832
Number of samples both wrong predicted in original and adversarial dataset:  1449
------------------------------------------------------------------------------
Method  Shear
Number of perturb samples: 442
Number of wrong predicted: 351
Number of correctly predicted in origin dataset but wrong in adversarial: 153
Number of both wrong predicted in origin and adversarial dataset: 198
------------------------------------------------------------------------------
Method  Contrast
Number of perturb samples: 387
Number of wrong predicted: 57
Number of correctly predicted in origin dataset but wrong in adversarial: 8
Number of both wrong predicted in origin and adversarial dataset: 49
------------------------------------------------------------------------------
Method  GaussianBlur
Number of perturb samples: 436
Number of wrong predicted: 181
Number of correctly predicted in origin dataset but wrong in adversarial: 71
Number of both wrong predicted in origin and adversarial dataset: 110
------------------------------------------------------------------------------
Method  MotionBlur
Number of perturb samples: 458
Number of wrong predicted: 215
Number of correctly predicted in origin dataset but wrong in adversarial: 92
Number of both wrong predicted in origin and adversarial dataset: 123
------------------------------------------------------------------------------
Method  GradientLuminance
Number of perturb samples: 1243
Number of wrong predicted: 154
Number of correctly predicted in origin dataset but wrong in adversarial: 4
Number of both wrong predicted in origin and adversarial dataset: 150
------------------------------------------------------------------------------
Method  Rotate
Number of perturb samples: 405
Number of wrong predicted: 298
Number of correctly predicted in origin dataset but wrong in adversarial: 136
Number of both wrong predicted in origin and adversarial dataset: 162
------------------------------------------------------------------------------
Method  SaltAndPepperNoise
Number of perturb samples: 413
Number of wrong predicted: 116
Number of correctly predicted in origin dataset but wrong in adversarial: 29
Number of both wrong predicted in origin and adversarial dataset: 87
------------------------------------------------------------------------------
Method  Translate
Number of perturb samples: 419
Number of wrong predicted: 159
Number of correctly predicted in origin dataset but wrong in adversarial: 57
Number of both wrong predicted in origin and adversarial dataset: 102
------------------------------------------------------------------------------
Method  GradientBlur
Number of perturb samples: 440
Number of wrong predicted: 92
Number of correctly predicted in origin dataset but wrong in adversarial: 26
Number of both wrong predicted in origin and adversarial dataset: 66
------------------------------------------------------------------------------
Method  Perspective
Number of perturb samples: 401
Number of wrong predicted: 181
Number of correctly predicted in origin dataset but wrong in adversarial: 75
Number of both wrong predicted in origin and adversarial dataset: 106
------------------------------------------------------------------------------
Method  Curve
Number of perturb samples: 410
Number of wrong predicted: 361
Number of correctly predicted in origin dataset but wrong in adversarial: 162
Number of both wrong predicted in origin and adversarial dataset: 199
------------------------------------------------------------------------------
Method  Scale
Number of perturb samples: 434
Number of wrong predicted: 116
Number of correctly predicted in origin dataset but wrong in adversarial: 19
Number of both wrong predicted in origin and adversarial dataset: 97
------------------------------------------------------------------------------
分析结果包含:
评测的样本数量:5888
CNN-CTC模型在原数据集上的准确率:85.4%
CNN-CTC模型在扰动数据集上的准确率:57.2%
在原图上预测正确,扰动后图片预测错误的 样本数量:1736
在原图和扰动后图片上均预测错误的样本数量:782
对于每一个扰动方法,包含样本数量、扰动样本预测错误的数量、原样本预测正确扰动后预测错误的数量、原样本和扰动样本均预测错误的数量。
如果模型对某扰动方法扰动后的图片预测错误率较高,则说明CNN-CTC模型对于该方法鲁棒性较差,建议针对性提升,如Rotate、Curve、MotionBlur和Shear这几种扰动方法,大部分扰动后的图片都预测错误,建议进一步分析。
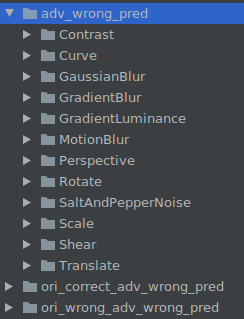
同时在ADV_TEST_DATASET_PATH路径下生成3个文件夹:
adv_wrong_pred                  # 模型对于扰动后图片分类错误的数据集
ori_corret_adv_wrong_pred       # 模型对于原图分类正确但扰动后图片分类错误的数据集
ori_wrong_adv_wrong_pred        # 模型对于原图分类和扰动后图片均分类错误的数据集
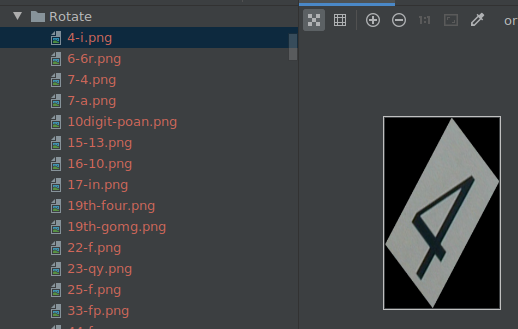
每个文件夹均按照扰动方法分类:
每张图片的命名格式:真值-预测值.png,如下图:
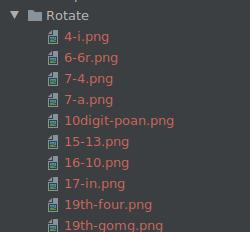
存储的图片可供进一步分析,是模型质量问题、图片质量问题、还是扰动方法影响图片语义从而导致预测错误。