Loading Image Dataset
Ascend GPU CPU Data Preparation
![]()
![]()
![]()
Overview
In computer vision training tasks, it is often difficult to read the entire dataset directly into memory due to memory capacity. The mindspore.dataset module provided by MindSpore enables users to customize their data fetching strategy from disk. At the same time, data processing and data augmentation operators are applied to the data. Pipelined data processing produces a continuous flow of data to the training network, improving overall performance.
In addition, MindSpore supports data loading in distributed scenarios. Users can define the number of shards while loading. For more details, see Loading the Dataset in Data Parallel Mode.
This tutorial uses the MNIST dataset [1] as an example to demonstrate how to load and process image data using MindSpore.
Preparations
Importing Module
This module provides APIs to load and process datasets.
[1]:
import mindspore.dataset as ds
Downloading Dataset
put the dataset in the path ./datasets/MNIST_Data, the directory structure is as follows:
./datasets/MNIST_Data
├── test
│   ├── t10k-images-idx3-ubyte
│   └── t10k-labels-idx1-ubyte
└── train
    ├── train-images-idx3-ubyte
    └── train-labels-idx1-ubyte
The following example code downloads and unzips the dataset to the specified location.
[2]:
import os
import requests

requests.packages.urllib3.disable_warnings()

def download_dataset(dataset_url, path):
    filename = dataset_url.split("/")[-1]
    save_path = os.path.join(path, filename)
    if os.path.exists(save_path):
        return
    if not os.path.exists(path):
        os.makedirs(path)
    res = requests.get(dataset_url, stream=True, verify=False)
    with open(save_path, "wb") as f:
        for chunk in res.iter_content(chunk_size=512):
            if chunk:
                f.write(chunk)
    print("The {} file is downloaded and saved in the path {} after processing".format(os.path.basename(dataset_url), path))

train_path = "datasets/MNIST_Data/train"
test_path = "datasets/MNIST_Data/test"

download_dataset("https://mindspore-website.obs.myhuaweicloud.com/notebook/datasets/mnist/train-labels-idx1-ubyte", train_path)
download_dataset("https://mindspore-website.obs.myhuaweicloud.com/notebook/datasets/mnist/train-images-idx3-ubyte", train_path)
download_dataset("https://mindspore-website.obs.myhuaweicloud.com/notebook/datasets/mnist/t10k-labels-idx1-ubyte", test_path)
download_dataset("https://mindspore-website.obs.myhuaweicloud.com/notebook/datasets/mnist/t10k-images-idx3-ubyte", test_path)
./datasets/MNIST_Data
├── test
│   ├── t10k-images-idx3-ubyte
│   └── t10k-labels-idx1-ubyte
└── train
    ├── train-images-idx3-ubyte
    └── train-labels-idx1-ubyte

2 directories, 4 files
Loading Dataset
MindSpore supports loading common datasets in the field of image processing that come in a variety of on-disk formats. Users can also implement custom dataset class to load customized data. For the detailed loading method of various datasets, please refer to the Loading Dataset in the programming guide.
The following tutorial shows how to load the MNIST dataset using the MnistDataset in the mindspore.dataset module.
Configure the dataset directory and create the
MnistDataset.
[3]:
DATA_DIR = './datasets/MNIST_Data/train'
mnist_dataset = ds.MnistDataset(DATA_DIR, num_samples=6, shuffle=False)
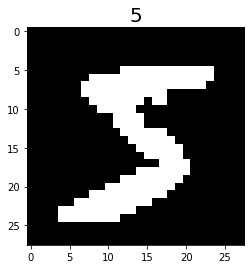
Create an iterator then obtain data through the iterator.
[4]:
import matplotlib.pyplot as plt

mnist_it = mnist_dataset.create_dict_iterator()
data = next(mnist_it)
plt.imshow(data['image'].asnumpy().squeeze(), cmap=plt.cm.gray)
plt.title(data['label'].asnumpy(), fontsize=20)
plt.show()
In addition, users can pass in a sampler parameter to specify the sampling process during dataset loading. For the data samplers supported by MindSpore and their detailed usage methods, please refer to the programming guide sampler.
Processing Data
For the data processing operators currently supported by MindSpore and their detailed usage methods, please refer to the Processing Data in the programming guide.
The following tutorial demonstrates how to construct a pipeline and perform operations such as shuffle, batch and repeat on the MNIST dataset.
[5]:
for data in mnist_dataset.create_dict_iterator():
    print(data['label'])
5
0
4
1
9
2
Shuffle the dataset.
[6]:
ds.config.set_seed(58)
ds1 = mnist_dataset.shuffle(buffer_size=6)

print('after shuffle: ')
for data in ds1.create_dict_iterator():
    print(data['label'])
after shuffle:
4
2
1
0
5
9
Add
batchaftershuffle.
[7]:
ds2 = ds1.batch(batch_size=2)

print('after batch: ')
for data in ds2.create_dict_iterator():
    print(data['label'])
after batch:
[4 2]
[1 0]
[5 9]
Add
repeatafterbatch.
[8]:
ds3 = ds2.repeat(count=2)

print('after repeat: ')
for data in ds3.create_dict_iterator():
    print(data['label'])
after repeat:
[4 2]
[1 0]
[5 9]
[2 4]
[0 9]
[1 5]
The results show the dataset is repeated, and the order of the replica is different from that of the first copy. Having repeat in the pipeline results in the execution of repeated operations defined in the entire pipeline, instead of simply copying the current dataset. So the order of the replica is different from that of the first copy after shuffle.
In addition, you need to pay attention to the sequence of repeat and batch operations: 1) Usually the batch operation is performed before the repeat operation. 2) If the batch operation is performed after the repeat operation, the batch operation will batch the data between the two epochs together (As the batch operator contains the drop_remainder parameter (default value is False), the data at the end of epoch with less than one batch will be discarded by default. Thus in some cases,
swapping the order of batch and repeat will cause the number of batches contained in the dataset to be inconsistent.).
Augmentation
For the data augmentation operators supported by MindSpore and their detailed usage methods, please refer to the programming guide Data Augmentation.
The following tutorial demonstrates how to use the c_transforms module to augment data in the MNIST dataset.
Import related modules and load the dataset.
[9]:
from mindspore.dataset.vision import Inter
import mindspore.dataset.vision.c_transforms as transforms

mnist_dataset = ds.MnistDataset(DATA_DIR, num_samples=6, shuffle=False)
Define augmentation operators and perform the
ResizeandRandomCropoperations on images in the dataset.
[10]:
resize_op = transforms.Resize(size=(200, 200), interpolation=Inter.LINEAR)
crop_op = transforms.RandomCrop(150)
transforms_list = [resize_op, crop_op]
ds4 = mnist_dataset.map(operations=transforms_list, input_columns='image')
Visualize the result of augmentation.
[11]:
mnist_it = ds4.create_dict_iterator()
data = next(mnist_it)
plt.imshow(data['image'].asnumpy().squeeze(), cmap=plt.cm.gray)
plt.title(data['label'].asnumpy(), fontsize=20)
plt.show()
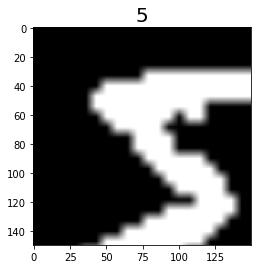
The original image is scaled up then randomly cropped to 150 x 150.
References
[1] Y. LeCun, L. Bottou, Y. Bengio, and P. Haffner. Gradient-based learning applied to document recognition.